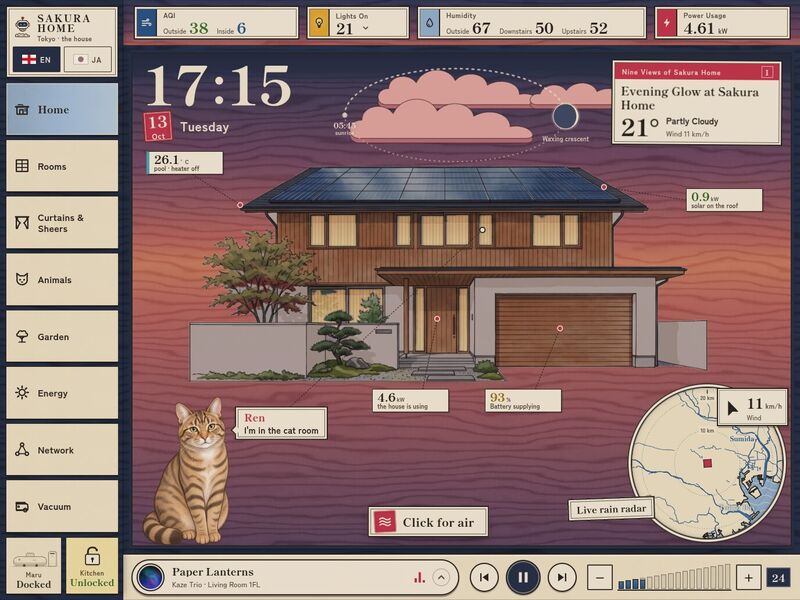
You are setting up Ukiyo-e, a wall-tablet dashboard for Home Assistant, on somebody's own home. This file is written for you, the person's AI coding agent: follow it top to bottom and you should not need to ask anyone else. The person who gave you this package may not be a developer — explain choices to them in plain words, ask them only what only they can know (which lights are in which room, what their pets are called), and keep a short log of what you mapped.
Everything in this package is a made-up demo home called Sakura Home in Tokyo (family Ken, Mika and toddler Aiko, six cats: Mochi, Yuki, Sora, Kuro, Hana, Ren). None of it is a real household. Your job is to keep the dashboard and replace the made-up home with theirs.
1. What you're building
Ukiyo-e — the Home view at dusk
A full-screen React app for a landscape wall tablet, drawn like a modern Japanese woodblock print. The Home view is a print of the house that inks itself in when the app opens and then lives through the day: the sky follows the real sun and moon, the house turns into its night print after sunset, a window glows when the light in that room is on, and the weather entity brings clouds, rain, snow, fog, wind or a thunderstorm. A sun dial lets you drag through the day (with the forecast for later hours), one of the cats sits on the sill and says which room it is in, little tags show solar, grid, battery and the pool, and a live rain radar sits in the corner. Tapping "air" opens the climate list, the calendar and the air quality per area. Seven more views: Rooms (cards per room: lights, dimming, A/C, curtains, locks, temperature), Curtains & Sheers (3D curtains in front of each window's view), Animals (where each cat is, time per room, litter boxes, camera spottings), Garden (a bird's-eye garden print with 20 lamps), Energy (today's power, totals, battery, savings), Network and Vacuum; plus a music player and English ⇄ 日本語.
What the person needs: Home Assistant 2024.1 or newer (it uses the standard WebSocket and REST APIs; a newer version is fine); a wall tablet with a modern browser (designed on a 13-inch iPad in landscape, also checked on 10.9–11-inch iPads; any 4:3-ish screen of at least 1180 × 820 CSS pixels works); a computer with Node.js 18 or newer to build it. Nothing else — no cloud service, no account.
Time: demo running in 10 minutes. Going live with their own entities: 2–6 hours, depending on how many of the features they have. Their own pictures (the house, garden, rooms, pets): one to three evenings with an image generator, longer with an illustrator.
2. What's in this package
README.md               three lines: what this is, read HANDOFF.md, npm install && npm run dev
HANDOFF.md              this guide
LICENSE                 MIT (code)
package.json            exact dependency versions this was built and tested with
index.html              the page shell (title, icons, iPad web-app tags)
vite.config.ts          dev server (+ Home Assistant proxy for live development) and builds; BASE = where it is hosted
tsconfig.json           TypeScript settings (npm run typecheck passes with 0 errors)
.env.example            copy to .env.live to go live (mode, Home Assistant address, token for dev only)
panel-loader.js         go-live mode B: shows the dashboard as a page in Home Assistant's sidebar
.gitignore
live/README.md          the go-live kit: modes A (inside HA), B (sidebar panel), C (development) in detail
docs/still.jpg          the picture above
docs/entities.csv       all 521 entity ids the dashboard reads or controls, where each is configured, demo state
tools/                  picture tools (Python 3 + Pillow) and a measuring page — see Step 4
  cutout.py             cut a drawing out of its plain background (house, cats)
  intro_layers.py       make the ink layer + pen timing map for the "inks itself in" intro
  lit_layer.py          paint the warm "lights on" glow for windows / glass / pool
  prints.py             room prints (+ indigo twin), curtain plates (+ night + thumb), night versions, exact sizes
  measure.html          open a picture in a browser, click/drag to measure windows, anchors, lamps (offline)
  examples/house-windows.json   the demo house's windows, as an example for lit_layer.py
src/
  main.tsx              start-up switch: demo (default) · live · sidebar panel
  main.demo.tsx         demo entry: fake clock + network jail + made-up home + demo bridge
  main.live.tsx         live entry (modes A and C): connects with wsBackend, then renders the app
  main.panel.tsx        live entry for mode B (Home Assistant hands over its `hass` object)
  App.tsx               language provider + the app shell
  app/                  view list (views.tsx) and the entrance animations per view
  components/           shell (side bar, top strip, media bar), home (house stage, sun dial, cat sill, radar,
                        energy tags, climate list, calendar, air), rooms, curtains3d (three.js engine), animals,
                        music, sky (time + weather context), vacuum, common
  views/                one file per view: Home, Rooms, CurtainsSheers, Animals, Garden, Energy, Network, Vacuum
  config/               EVERY entity id, room, window, lamp position and picture anchor — this is what you edit
  ha/                   types.ts (the HaBackend interface), HaProvider.tsx (hooks), wsBackend.ts / hassBackend.ts
                        (live), authFetch.ts (adds the login token to the app's /api calls), mockBackend.ts (demo)
  lib/                  sky + sun/moon maths, formatting, history/calendar hooks, network view data, music
  i18n/                 i18n.tsx (t() + language switch), ja.ts (English → Japanese strings), ja-fonts.ts
  styles/               theme.css (colour + font tokens), fonts.css, app.css
  assets/               pictures bundled by Vite: house/, garden/, cats/, rooms/, curtains/ (+ thumbs/),
                        tex/ (paper + wood-grain textures), fonts/ (Latin subsets of the two Japanese typefaces)
  demo/                 the demo layer only: sandbox.ts (clock + network jail), snapshot.ts (made-up states),
                        synth.ts (made-up energy day, cat walks), replay.ts, polish.ts, calendar.ts, music.ts,
                        clock.ts, bridge.ts (time/weather control from an embedding page)
static/                 copied as-is into the build
  fonts/                Oswald, Archivo, Manrope (+ their licence files)
  local/                app icon, small SVG icons (feature lights, litter box states), network gear drawings,
                        snapshots/animals/ (the two camera "spotting" pictures)
demo/ demo-only pictures: four camera stills, twelve album covers3. Run the demo first
Prove the toolchain before touching their house:
npm install
npm run dev            # prints a local address, e.g. http://localhost:5173 — open it
The made-up Sakura Home runs with no Home Assistant at all: a fake clock (16:30 today), made-up states, a made-up day of solar power, cats walking from room to room, a music library. Every button works against the demo backend. The network is jailed: the demo can only reach the rain radar tiles and Google Fonts (Japanese text only).
Useful demo URL parameters (they combine):
| parameter | effect |
|---|---|
?t=21:15 | start at that time of day (the clock keeps running from there); ?demoTime= and ?sky=HH:MM mean the same |
?wx=rainy | pin the weather: sunny partlycloudy cloudy rainy pouring lightning-rainy fog snowy windy |
?lang=ja | start in Japanese |
?intro=off | skip the "inks itself in" intro |
?clock=real | use the real clock instead of 16:30 |
npm run build writes a static copy of the demo to dist/; npm run typecheck must report 0 errors.
4. How it works
One interface to Home Assistant. Every view talks to Home Assistant through src/ha/types.ts → HaBackend
(getStates, subscribe, callService, callServiceResponse, browseMedia, ready) and the hooks in
src/ha/HaProvider.tsx:
HaBackend ──► <HaProvider backend=…> ──► useEntity(id) / useEntities([ids])   (live state, re-renders on change)
                                     ──► useCallService()                      (light.turn_on, script.turn_on …)
                                     ──► useCallServiceResponse()              (weather.get_forecasts …)
                                     ──► useBrowseMedia()                      (radio stations)
views/*  ──►  components/*  ──►  the hooks above;  config/*.ts says WHICH entities
Three backends implement it: ha/mockBackend.ts (the demo, no network), ha/wsBackend.ts (a real Home Assistant over
its WebSocket API, with Home Assistant's own login or a token) and ha/hassBackend.ts (inside Home Assistant's
sidebar). Views subscribe only to the entities they show — never "all states" — so large installations stay fast.
A few REST calls go straight to /api/… with fetch: /api/history/period (energy charts, cat timelines,
sensor sparklines), /api/calendars/<id> (the calendar), /api/states (the Lights On list) and /api/template
(which switches count as lights). In live mode ha/authFetch.ts adds the login token to them. In the demo,
lib/mockApi.ts answers them.
Start-up switch. src/main.tsx picks the entry: npm run dev / npm run build → main.demo.tsx (demo);
VITE_HA_MODE=live (npm run dev:live / npm run build:live, from .env.live) → main.live.tsx; ?panel=1 in a
live build → main.panel.tsx. A live build contains no demo code.
Config lives in src/config/:
| file | holds |
|---|---|
entities.ts | side bar (SHELL), top strip (TOPSTRIP), the 15 climate units (CLIMATE), the 10 air areas (AREAS), calendars (CALENDARS), the weather entity (WEATHER) |
rooms.ts | the 18 room cards (ROOMS: light group, climate, curtain states, temperature/humidity, lock, feature light) and the A/C helper pairs (ROOM_AC) |
curtains3d.ts | the 17 curtain rooms of the 3D view: covers, timings, cloth colour, the glass rectangle on each window plate |
curtains.ts | demo only (how long each made-up curtain motor runs) |
gardenLights.ts | the 20 garden lamps: entity, name, number and position on the garden print |
house.ts | the house print: crop, the windows (boxes + the light that lights each), energy tag anchors, where each room is (for the cat's speech bubble) |
animals.ts | cats, their room sensors, the time-per-room colours, camera spottings, litter boxes |
place.ts | the home's latitude/longitude (sun, moon, radar centre) |
plates.ts | which picture is each curtain room's window plate |
vacuumPlan.ts | the vacuum's floor plan (areas drawn in SVG) |
Some ids sit next to the code that uses them: views/EnergyView.tsx (E), components/home/EnergyTags.tsx,
components/vacuum/vacuumModel.ts, components/music/useMusicData.ts (PLAYERS), lib/music.ts (SP_PLAYER),
lib/networkData.ts (the network view's devices). docs/entities.csv lists every id with its file.
Time and sky. components/sky/SkyContext.tsx holds the "shown time" (now, or where the sun dial is dragged)
and the weather condition (the weather entity's state, or the hourly forecast when the dial is in the future).
lib/sky.ts computes the sun and moon for config/place.ts and paints the sky colours as CSS variables on
<html> (--sky-top, --sky-mid, --sky-low, --sky-glow, --night …); it reads the wall clock in the home's
time zone (HOME_UTC_OFFSET_MS, Tokyo in the demo — see Step 3). Weather → wxKind() →
clear / partly / cloudy / fog / rain / pour / storm / wind / snow → clouds, rain, snow, fog and lightning layers in
components/home/PrintWeather.tsx and HouseStage.tsx.
Languages. Every visible English string goes through t("English text") (src/i18n/i18n.tsx); ja.ts is a
plain { "English": "日本語" } object. The flag button switches language, sets <html lang> and data-lang, and
loads the Japanese web fonts only then (ja-fonts.ts). To add their language: copy ja.ts to e.g. de.ts, translate
the values, add the code to the Lang type and the toggle in i18n.tsx, and pick a flag in
components/common/Flags.tsx. Strings that are not in the dictionary fall back to English.
Theme. src/styles/theme.css: paper (--paper*), sumi ink (--sumi*), indigo (--ai*), Prussian blue
(--bero*), beni red (--beni*), yellow (--kihada*), greens (--kusa*), the fonts (--f-mincho, --f-gothic).
Change colours there; views use the tokens.
How the pictures are layered.
- House (
components/home/HouseStage.tsx):house-day.webp(cut-out colour print, transparent around the house) withhouse-night.webpcross-faded on top by the sun's altitude; a warm dusk tint masked by the day print; andhouse-lit.webp(the glass of every window, glowing) shown only inside the window boxes (config/house.tsWINDOWS) whose light is on. The intro drawshouse-key.webp(ink outlines) alonghouse-pen.png(when the pen reaches each point) and brushes the colour in, in WebGL. All five layers share one size and framing. - Garden (
views/GardenView.tsx):day.webp+night.webp(same framing) + two glow layers (glass-lit.webpfor the lit glass doors,pool-lit.webpfor the lit pool) + numbered lamp beads atgardenLights.tspositions. - Cats:
assets/cats/<id>.webp— whole-body portraits on transparent background, 640 px tall; the sill crops them by the head (HEADtable incomponents/home/CatSill.tsx). - Rooms:
assets/rooms/<key>.webp(colour) and<key>-ai.webp(indigo twin, shown when the room's light is off). - Curtains:
assets/curtains/<key>-day.webp/-night.webp= the view through that room's window; the three.js engine hangs cloth in front of the glass rectangle given incurtains3d.ts(glass: [x0, y0, x1, y1]fractions).
Demo layer (src/demo/ + ha/mockBackend.ts + lib/mockApi.ts): a fake clock, a network jail, the made-up
states and a synthetic day. demo/bridge.ts lets the dashboards.casa page set the demo's time and weather. None of
it is used when live.
5. Step 1 — Inventory their Home Assistant
- In Home Assistant: profile (bottom left) → Security → Long-lived access tokens → create one. Treat it like a password; keep it out of every file you might share.
- List their entities:
curl -s -H "Authorization: Bearer $HA_TOKEN" http://homeassistant.local:8123/api/states \
  | python3 -c 'import json,sys; [print(e["entity_id"], "|", e["state"], "|", e["attributes"].get("friendly_name","")) for e in json.load(sys.stdin)]' \
  | sort > their-entities.txt
(Or, without a terminal: Developer tools → States, filter by domain.) Keep their-entities.txt and your
mapping notes outside any folder you publish — they describe a real home.
3. Domains this dashboard uses: weather, sun, light, switch, climate, cover (or their curtain scripts),
lock, sensor (temperature, humidity, air quality, CO₂, power, energy, battery, network stats), calendar,
media_player, vacuum, select, button, input_number + script (A/C helpers), input_text +
input_datetime (spottings), camera (state only).
4. Match by friendly_name, area and device_class. Ask the person to confirm room by room. For every feature they
don't have, note "hide" — Step 2 says how.
6. Step 2 — Map entities
Edit the files in the first column. Example ids are the demo's (*.sk_*). docs/entities.csv has all 521.
| Feature | Where (file → key) | What it is | Domain | State / attributes read | Services called | Example | If they don't have it |
|---|---|---|---|---|---|---|---|
| Weather (sky, cartouche, radar wind, curtain view) | config/entities.ts → WEATHER; also views/CurtainsSheersView.tsx → WEATHER_ENTITY | a weather entity with hourly forecasts | weather | state (condition), temperature, wind_speed, wind_bearing, wind_speed_unit | weather.get_forecasts (type hourly, with response) | weather.sk_tokyo | Add the free Met.no integration (Settings → Devices & services). Without it the sky stays "partly cloudy". |
| Sun | built in | sun position | sun | state above_horizon/below_horizon | — | sun.sun | always there |
| Top strip: air quality | config/entities.ts → TOPSTRIP.aqiOutside, aqiInside | AQI numbers (0–500 scale colours) | sensor | numeric state | — | sensor.sk_outside_aqi | point both at any PM2.5/AQI sensor, or delete the c-air block in components/shell/TopStrip.tsx |
| Top strip: humidity | TOPSTRIP.humOutside, humDownstairs, humUpstairs | relative humidity % | sensor | numeric state | — | sensor.sk_outside_humidity | reuse one sensor, or delete the c-hum block |
| Top strip: power | TOPSTRIP.power | whole-home power now, kW | sensor | numeric state | — | sensor.sk_house_power | see "Energy helpers" below |
| Lights On (top strip + list) | lib/useRealLights.ts → DIMMERS_INTEGRATION, EXCLUSIONS | every light.* that is on (groups, keypads, LEDs excluded) + switch.* from one integration that are really lights | light, switch | state, brightness, friendly_name | — (list only) | — | set DIMMERS_INTEGRATION to the integration whose switches drive lights, or to "" |
| Side bar | config/entities.ts → SHELL | media (the media bar's player), vacuum + vacuumState, lock (the front-door lock button) | media_player, vacuum, sensor, lock | state | lock.lock / lock.unlock | lock.sk_kitchen_door | remove the lock button in components/shell/Sidebar.tsx; vacuum: see Vacuum |
| Home "air": climate list | config/entities.ts → CLIMATE (15 units, pin keeps one at top/bottom) | A/C units + a pool heater | climate | state (hvac mode), current_temperature, temperature | climate.set_hvac_mode, climate.set_temperature | climate.sk_ac_dining | list only the units they have |
| Home "air": areas | config/entities.ts → AREAS (10) | temperature, humidity, AQI, CO₂ per area | sensor | numeric state (+ history for the sparkline) | — | sensor.sk_master_co2 | drop areas; co2 is optional |
| Calendar | config/entities.ts → CALENDARS (5, with colours) | calendars | calendar | events via REST /api/calendars/<id> | — | calendar.sk_family | list theirs (Google/CalDAV/Local calendar all work) |
| House windows | config/house.ts → WINDOWS | which light makes which window glow | light | state | — | light.sk_1f_tatami | after re-drawing the house: re-measure (Step 4) |
| Energy tags + Energy view | views/EnergyView.tsx → E; components/home/EnergyTags.tsx → E, POOL, POOL_PROBE | power (kW): gridPower (+ import / − export), solarPower, loadPower; batt = battery %; energy (kWh) today/week/month for grid import, solar, battery discharge; savings (currency) | sensor | numeric state + history | — | sensor.sk_solar_power | see "Energy helpers"; no solar/battery → remove the Energy view (Make it theirs) and the tags |
| Rooms | config/rooms.ts → ROOMS (18): light, climate, sheer, blackout, temp, humidity, lock, featureLight | per room: a light group, A/C, curtain open states (on/open = open), sensors, lock | light, climate, switch / cover / input_boolean, sensor, lock | state, brightness | light.toggle, light.turn_on (brightness_pct), light.turn_off | light.sk_1f_living | set a field to null to hide that part of a card; delete rooms they don't have |
| Room A/C buttons | config/rooms.ts → ROOM_AC | per room: helper (target °C) + script (on/off) + the room's climate | input_number, script | helper state | input_number.increment/decrement, script.turn_on | input_number.sk_living_ac_target | create the helper + script (recipe below), or delete the room's ROOM_AC entry |
| Curtains & Sheers | config/curtains3d.ts → ROOMS3D (17 rooms × 1–2 covers) | each cover is one of: { kind: "cover", entity } (a normal cover.*), { kind: "scripted", open, dir, script } (state switch + direction select + toggle script), { kind: "buttons", openLed, closeLed, openBtn, closeBtn } | cover / switch + input_select + script / button | state | cover.toggle / script.turn_on / button.press | script.sk_dining_curtains_toggle | use kind: "cover" for normal motor curtains; remove rooms without covers |
| Animals: where each cat is | config/animals.ts → CATS, roomSensor() = sensor.<cat>_room | a room-level presence sensor per pet whose state is a room key (ROOM_RATIO keys, also CAT_ROOM_AT in house.ts) | sensor | state + history (timeline) | — | sensor.mochi_room | BLE tags on collars + a room-level BLE presence integration (several community integrations in HACS do this); map their area names to the room keys with a Template helper, or rename the keys. No pet tracking → remove the Animals view and the sill cat. |
| Animals: time per room | ratioSensor() = sensor.<cat>_room_ratio_<7d|today>_<room> | % of time in that room | sensor | numeric state | — | sensor.mochi_room_ratio_today_cat_room | History stats helpers (type Ratio), only for rooms the cat uses; missing ones show 0 |
| Animals: litter boxes | config/animals.ts → LITTER_BOXES | a state sensor (cleaning/working → "Cleaning") and an occupied sensor (on/true → "Occupied") per box | sensor | state | — | sensor.sk_litter_cat_room_state | delete entries / the card |
| Animals: spottings | config/animals.ts → SPOTTINGS | a snapshot picture + input_text (camera name) + input_datetime (when) | input_text, input_datetime | state | — | input_text.sk_spotting_1_camera | automation recipe below, or delete the list |
| Garden | config/gardenLights.ts → GARDEN_LIGHTS (20), POOL_LIGHTS, SKYLIGHT_LIGHT | lamps (light or switch) at positions on the garden print | light, switch | state | light.toggle / switch.toggle, homeassistant.turn_on/turn_off (all) | switch.sk_garden_pavilion | fewer lamps is fine; re-measure positions on their garden picture |
| Vacuum | components/vacuum/vacuumModel.ts → VAC, MODE, OP_STATE, OP_ERROR, IDENTIFY; floor plan config/vacuumPlan.ts | robot vacuum (+ clean-mode select, status/error sensors, locate button) | vacuum, select, sensor, button | state, supported_features, options | vacuum.start/pause/stop/return_to_base/locate, select.select_option, button.press | vacuum.sk_maru | only VAC is essential; remove the view if none |
| Music (media bar + player) | components/music/useMusicData.ts → PLAYERS (5 speakers); config/entities.ts → SHELL.media | speakers | media_player | state, media_title, media_artist, media_album_name, entity_picture, volume_level, group_members, shuffle, position | media_player.* (play/pause, next, previous, seek, volume_set, shuffle_set, play_media, join, unjoin) | media_player.sk_living_speaker | any media players work (smart speakers, cast devices, …) |
| Music library (search, favourites, playlists) | lib/music.ts → SP_PLAYER + the musicplus service domain | a music-service integration whose services return Web-API-style results | media_player + musicplus.* | responses | musicplus.get_playlist_favorites, search_tracks, … | media_player.sk_music_account | if they have a music-service integration whose services return search results and playlists (some community integrations in HACS do), change "musicplus" in lib/music.ts to its domain and adapt the result fields; otherwise the library tab stays empty and playback still works |
| Network | lib/networkData.ts (gateway, switches, access points, NVR, servers, cameras) | CPU %, memory %, temperature, clients, uptime, storage % sensors; camera states | sensor, camera | numeric state | — | sensor.sk_net_ap1_cpu | point at what their router/AP/NAS integrations expose; or remove the view |
Helpers and recipes (prefer the UI; YAML only where a recipe needs it)
Create helpers in Settings → Devices & services → Helpers → Create helper. For scripts and automations, create
them in the UI editor and use ⋮ → Edit in YAML to paste the YAML below (the editor validates it). Always target
entity_ids, never device ids.
A/C per room (ROOM_AC). 1) Helper → Number: name "Living A/C target", min 16, max 30, step 1, unit °C →
input_number.living_ac_target. 2) A script "Living A/C on/off":
alias: Living A/C on/off
mode: single
sequence:
  - if:
      - condition: state
        entity_id: climate.living_room
        state: "off"
    then:
      - action: climate.set_temperature
        target:
          entity_id: climate.living_room
        data:
          hvac_mode: cool
          temperature: "{{ states('input_number.living_ac_target') | float(24) }}"
    else:
      - action: climate.turn_off
        target:
entity_id: climate.living_room- An automation so the + / − buttons move the unit while it runs:
alias: Living A/C follows its target
mode: restart
triggers:
  - trigger: state
    entity_id: input_number.living_ac_target
conditions:
  - condition: not
    conditions:
      - condition: state
        entity_id: climate.living_room
        state: "off"
actions:
  - action: climate.set_temperature
    target:
      entity_id: climate.living_room
    data:
      temperature: "{{ trigger.to_state.state | float }}"
Then ROOM_AC["LIVING ROOM"] = [{ helper: "input_number.living_ac_target", script: "script.living_a_c_on_off" }]
(use the script's real entity id) and climate: "climate.living_room" on the room. Use hvac_mode: heat in a cold
climate.
Energy helpers. The app wants power in kW. If their sensors are in W, make a Template helper (sensor, unit
kW, device class power, state class measurement) with {{ states('sensor.inverter_pv_power') | float(0) / 1000 }}.
For a whole-home power that is the sum of circuits use the Combine the state of several sensors helper (type sum)
instead of a template. Today / week / month energy: three Utility Meter helpers (cycle daily, weekly, monthly) on
each cumulative kWh sensor (grid import, solar production, battery discharge). Savings: a Template helper per period,
e.g. today = `{{ ((states('sensor.solar_today')|float(0) - states('sensor.export_today')|float(0)) * 0.31
- states('sensor.export_today')|float(0) * 0.16) | round(2) }}
with their own tariff (the demo uses ¥31 import, ¥16 export per kWh; change the currency inviews/EnergyView.tsx` if needed) — or hide the savings card.
Cat time per room. Helper → History stats: entity sensor.mochi_room, state cat_room, type Ratio,
start {{ today_at() }}, end {{ now() }} → name it mochi_room_ratio_today_cat_room; for 7 days use start
{{ now() - timedelta(days=7) }}. Make only the rooms each cat really visits.
Camera spottings. If they run local object detection that reports a cat on a camera (a binary_sensor that turns
on), an automation can save a snapshot and note where and when:
alias: Cat spotted - keep a snapshot
mode: queued
triggers:
  - trigger: state
    entity_id: binary_sensor.garden_cat_occupancy
    to: "on"
actions:
  - action: camera.snapshot
    target:
      entity_id: camera.garden
    data:
      filename: /config/www/dashboard/local/snapshots/animals/spotting-1.jpg
  - action: input_text.set_value
    target:
      entity_id: input_text.spotting_1_camera
    data:
      value: Garden
  - action: input_datetime.set_datetime
    target:
      entity_id: input_datetime.spotting_1_time
    data:
      datetime: "{{ now().strftime('%Y-%m-%d %H:%M:%S') }}"
(The filename matches mode A's folder; /local/… in the app means "inside the dashboard's own folder" — see Gotchas.
Home Assistant may write into its www folder by default; if it refuses, add the folder to allowlist_external_dirs.)
7. Step 3 — Go live
The go-live kit is already wired in (details and troubleshooting: live/README.md).
cp .env.example .env.liveand edit it: keepVITE_HA_MODE=live.- Home location and time zone (the sky must be theirs):
src/config/place.ts→HOUSE_AT= their latitude and longitude (also the rain radar's centre);src/lib/sky.ts→HOME_UTC_OFFSET_MS= their UTC offset. Simplest and daylight-saving-proof when the tablet is in the home's time zone:export const HOME_UTC_OFFSET_MS = -new Date().getTimezoneOffset() * 60e3;The radar's rivers and coast are Tokyo's (lib/sumidaRiver.ts,lib/tokyoGeo.ts): makeRIVERS_PATH,SEAandCOASTempty strings, or draw their own from OpenStreetMap. - Pick a mode:
- A — inside Home Assistant (recommended).
npm run build:live→dist/. Copy everything indist/to<config>/www/dashboard/(Samba share, the File editor or Studio Code Server app, orscp). Openhttp://<home-assistant>:8123/local/dashboard/index.htmlon the tablet; Home Assistant's own login page appears once. Never put a token in a build — files inwww/are served without a login. - B — a page in Home Assistant's sidebar. Mode A, then copy
panel-loader.jsinto the same folder and add thepanel_custom:block from the top of that file (the one YAML-only step) and restart Home Assistant. - C — development against their Home Assistant. Set
VITE_HA_TARGETandVITE_HA_TOKENin.env.live,npm run dev:live. For your work only, on their own network.
- A — inside Home Assistant (recommended).
- Once it works live you may delete the demo:
src/demo/,src/ha/mockBackend.ts,src/lib/mockApi.ts,src/config/curtains.ts,src/main.demo.tsx,static/demo/, and theelse { import("./main.demo") }branch insrc/main.tsx. A live build already leaves all of it out, so this is only tidying.
8. Step 4 — Pictures
Every picture, what it is for, and whether to keep it (generic) or replace it (it shows the made-up home — replacing makes the dashboard theirs; the demo pictures may also stay as placeholders, they are free to use).
| Path | Count · size | Role | Keep / replace |
|---|---|---|---|
src/assets/house/house-day.webp | 1 · 2098×877, transparent around the house | the house print by day | replace |
src/assets/house/house-night.webp | 1 · same size + framing | the same print by night (all windows dark) | replace |
src/assets/house/house-lit.webp | 1 · same size, transparent | glow in every window's glass | replace (tool) |
src/assets/house/house-key.webp | 1 · same size, transparent | ink outlines for the intro | replace (tool) |
src/assets/house/house-pen.png | 1 · half size, greyscale | when the intro's pen reaches each point | replace (tool) |
src/assets/garden/day.webp, night.webp | 2 · 2400×1018 | the garden from above, day and night | replace |
src/assets/garden/glass-lit.webp, pool-lit.webp | 2 · 2400×1018, transparent | lit glass doors, lit pool | replace (tool) |
src/assets/cats/<id>.webp | 6 · ~400×640, transparent | whole-body cat portraits (sill, popups, Animals) | replace |
src/assets/rooms/<key>.webp + <key>-ai.webp | 18 + 18 · 771×571 | room card prints (colour; indigo when the light is off) | replace |
src/assets/curtains/<key>-day.webp, -night.webp | 17 + 17 · 1600×1195, 1195×1600 or 1600×1073 | the view through each curtain room's window | replace |
src/assets/curtains/thumbs/<key>.webp | 17 · 280×210 | room chips in the Curtains view | replace (tool) |
static/local/snapshots/animals/spotting-1.jpg, -2.jpg | 2 · 1273×720 | demo "cat spotted" camera pictures | replace (written by their automation when live) |
static/demo/camera/*.jpg | 4 · 1273×720 | demo camera stills | demo only — delete when live |
static/demo/music/cover-01…12.jpg | 12 · 320×320 | demo album covers | demo only — delete when live |
static/local/icon.png | 1 · 512×512 | app / home-screen icon (a blossom) | keep, or their own logo |
static/local/*.svg | 7 | feature-light and litter-box state icons | keep |
static/local/network/assets/gear/*.png | 11 | drawings of network devices (router, switch, access points, NAS, recorder …) | keep (generic) |
src/assets/tex/mokume.webp, washi.webp | 2 | wood-grain and paper textures | keep |
fonts (static/fonts, src/assets/fonts) | 8 | typefaces | keep |
The look to aim for
Modern Japanese woodblock print (shin-hanga): crisp, even black keylines like a key block; flat colour areas with soft graded edges (bokashi); a palette of Prussian blue, indigo, warm cedar browns, moss and pine greens, a little beni red; a faint washi paper grain; calm light. The house and the garden stand on plain white paper (no sky — the app paints the sky). The rooms and window views fill their frame edge to edge.
How the demo pictures were made (and how to make theirs)
The demo home was drawn with a paid hosted image generator, editing reference pictures of the made-up home (the house, garden, rooms and pets) into prints. Use their own photos as references — it is their home. The key to a consistent series: make the day house print first, then make the night print and the key block by editing that same picture ("change only the time of day"), never by generating a new one; use one reference picture as a style reference for all rooms; keep one shared style sentence ({S} below) in every prompt.
Prompt templates (adapt the bracketed parts):
- House, day (reference: a straight-on photo of their house): "Redraw this exact house as a finished Japanese woodblock-style colour print. Keep EXACTLY the same building, the same straight-on viewpoint, the same framing and proportions, and every element in exactly the same place: [roof, upper floor, windows, door, garage, wall, trees …]. Style: crisp, even sumi-black keylines like a woodblock key block; every area filled with flat, softly graded colour in the manner of shin-hanga prints, with a subtle washi paper grain. Remove the sky completely: the house and its small front garden stand on plain white paper with nothing behind them. No people, no cars, no animals, no text, no seals, no signature, no border."
- House, night (edit the day print): "Edit this print. Keep every keyline, every shape, the exact position and size of everything, and the plain white paper around the house exactly as they are. Change only the time of day to a clear evening after dark, printed in colour like a shin-hanga night print: deepen every colour into rich night tones, blue-black glass in every window (all windows dark, no lights on anywhere) — not a blue monochrome or a negative. The paper stays plain white. No moon, no stars, no sky, no lamps, no glow, no text, no border."
- House, key block (optional;
intro_layers.pycan derive it): "Edit this print: remove ALL colour and shading and keep ONLY its black keylines, exactly as they are, as a clean black-ink key block on plain white paper." - Garden (reference: a photo or plan from above, wide 21:9): "Redraw this exact garden as a finished Japanese woodblock-style colour print. Keep EXACTLY the same composition, viewpoint and framing and every element in the same place: [terrace, pool, trees, lamps …]. {S} Daylight. No people, no animals, no text, no border." Night: edit it like the house ("every garden lamp OFF and dark — the app lights them").
- Room (reference: a photo of the room): "Use the reference only for the room's layout, furniture and viewpoint, and draw this same room as a finished colour illustration in a modern ukiyo-e / shin-hanga print style. LANDSCAPE: the room fills the whole picture edge to edge. {S} No people, no animals, no text, no border."
- Window view (reference: a photo through the window, framing as in
config/curtains3d.ts): "Redraw this photograph as a Japanese woodblock print in the shin-hanga manner. Keep EXACTLY the same framing: the window frames and mullions in the same places, the same view through the glass. {S} Calm late-afternoon light." - Pet (reference: a photo of the pet): "A whole-body illustration of the cat in the reference photo — the same fur colours, markings and eye colour — sitting upright, slight three-quarter turn, paws and tail fully visible with space around it. Style: a modern Japanese picture-book drawing, a clean bold dark-brown outline, flat colours, fine fur strokes, soft shading. Transparent (or plain white) background, no shadow, no text, no collar."
- {S} = "Clean, confident sumi-black keylines, flat colour areas with gentle bokashi gradients, subtle washi paper grain."
Free alternatives (best first for this style):
- Image editing that keeps the composition (most important for day → night → key): Google Gemini (free tier image editing), ChatGPT's free image tier, or locally FLUX.1 Kontext [dev] in ComfyUI. Ask for the edit in one sentence and keep everything else.
- Generating from text / a reference: locally FLUX.1 [schnell] or SDXL in ComfyUI or Forge (fix the seed and use the same style prompt or a style LoRA for "ukiyo-e"/"woodblock print"); Draw Things on a Mac or iPad; free tiers of Microsoft Designer / Bing Image Creator, Ideogram, Leonardo, Adobe Firefly, Krea.
- Non-AI: their own photos traced or filtered into flat colour (a "posterize + outline" filter gets surprisingly close), a free 3D model of the house in Sweet Home 3D or Blender rendered with a toon/outline shader (perfect day/night registration for free), or an illustrator.
Process them (tools/, Python 3 + Pillow: pip install pillow)
# house: cut out (prints the crop box), the night print with the day's outline, the intro layers, the window glow
python3 tools/cutout.py house-day.png -o src/assets/house/house-day.webp --crop
python3 tools/cutout.py house-night.png -o src/assets/house/house-night.webp --mask-from house-day.png --crop
python3 tools/intro_layers.py src/assets/house/house-day.webp --key src/assets/house/house-key.webp --pen src/assets/house/house-pen.png
python3 tools/lit_layer.py src/assets/house/house-night.webp --shapes my-windows.json -o src/assets/house/house-lit.webp
# garden, glow layers from measured shapes
python3 tools/prints.py fit garden-day.png --size 2400x1018 -o src/assets/garden/day.webp
python3 tools/prints.py fit garden-night.png --size 2400x1018 -o src/assets/garden/night.webp   # or: prints.py night
python3 tools/lit_layer.py src/assets/garden/night.webp --shapes my-garden-glass.json -o src/assets/garden/glass-lit.webp
python3 tools/lit_layer.py src/assets/garden/night.webp --shapes my-pool.json --colour 170,230,255 -o src/assets/garden/pool-lit.webp
# cats, rooms, window plates
python3 tools/cutout.py mochi.png -o src/assets/cats/mochi.webp --crop --height 640
python3 tools/prints.py room kitchen.png --key kitchen
python3 tools/prints.py plate dining-window.png --key diningRe-measure (open tools/measure.html in a browser, drop the picture in, click / drag, copy the JSON)
config/house.ts:PAINT_W/PAINT_H= the full house picture's size before cutting,CROP= the boxcutout.pyprinted,WINDOWS[].boxes= window rectangles as fractions of the full picture (the light each belongs to),ENERGY_AT(where the solar/battery/house/pool tags point),CAT_ROOM_AT(where each room is, for the cat's bubble). Measure on the full picture;crop()converts.config/gardenLights.ts: each lamp'sat(fractions of the garden picture).config/curtains3d.ts: each plate'sglassrectangle (fractions of the plate).components/home/CatSill.tsx:RATIO(width/height of each cat picture) andHEAD(where the head is) for new cats.
Pictures larger than the app shows waste memory on a tablet: keep the sizes above, WebP quality ~85, no metadata (the tools save without it).
9. Step 5 — Build & run
npm run build:live→dist/→ copy to<config>/www/dashboard/(mode A). Rebuild and copy again after each change.- Screen: designed at 1376 × 1032 CSS px (a 13-inch iPad in landscape); the layout is fluid (CSS grid, 100 vh) and was checked at 1180 × 820. It is landscape only; it does not scale itself down, so pick a tablet of at least ~1180 px CSS width.
- iPad: open the dashboard in Safari → Share → Add to Home Screen (runs full screen, no bars); Settings → Display → Auto-Lock → Never while on its charger; Guided Access (Accessibility) locks it to the app.
- Android: Fully Kiosk Browser (start URL = the dashboard, keep screen on, motion detection to wake) or the browser's Add to Home screen.
- Keep the tablet on power; the app pauses its animations while the tab is hidden.
10. Step 6 — Verify
Tick each one on the tablet itself:
-
npm run typecheck→ 0 errors;npm run build:livesucceeds. - Home: the clock shows their local time; the sky matches outside (day/dusk/night); sunrise and sunset on the dial are their times; the weather label and temperature match their weather entity.
- Switch a light on that is in
WINDOWSafter dark → that window glows. - Every view opens: Home, Rooms (both floors), Curtains & Sheers, Animals, Garden, Energy, Network, Vacuum (or the ones they kept).
- Each control calls the right service (watch Developer tools → Events or the entity's logbook): a room light toggles and dims, an A/C button changes the unit, a curtain moves, a garden lamp toggles, the lock locks.
- Energy: the chart draws today "up to now"; totals look right.
- Language toggle → Japanese (or theirs) everywhere, then back.
- Browser console: no red errors (Safari: connect the iPad to a Mac → Develop menu; Chrome:
chrome://inspect). - Performance on the tablet: the Home intro is smooth, views switch without stutter, memory stays stable over a day (leave it running overnight once).
11. Make it theirs
- Name and logo: the side bar brand "SAKURA HOME" (
components/shell/Sidebar.tsx), the page title and web-app name (index.html), the house title "… at Sakura Home" / さくら邸 (poeticTitleincomponents/home/HouseStage.tsx), "Nine Views of Sakura Home" and other strings (search the code andi18n/ja.tsfor "Sakura"), the icon (static/local/icon.png). - Rooms and names: room names live in
config/rooms.ts(cards, upper case),config/curtains3d.ts,config/entities.ts(CLIMATE,AREAS),config/gardenLights.ts,config/animals.ts(cats and room labels); add each new English string toi18n/ja.tsif they keep Japanese. - Views: remove a view from
src/app/views.tsx(its side-bar entry goes with it); remove its entrance insrc/app/entrances.tsif you like. - Colours and fonts:
src/styles/theme.css. - Language: see "Languages" in How it works.
- Units and currency: the app shows °C, km/h, kW, kWh and ¥ — change the units in the views that show them
(
EnergyView.tsx,HouseStage.tsx,RadarMap.tsx) if their Home Assistant uses others.
12. Gotchas
- Time zone. The sun and moon are computed for the wall clock read in
HOME_UTC_OFFSET_MS— leave it at Tokyo and a European or American home gets Tokyo's sunrise. Set it (Step 3). /local/in the code means "this dashboard's ownstatic/localfolder": the build rewrites/local/…,/fonts/…to wherever the build is hosted (BASE). Pictures Home Assistant writes at run time (camera snapshots) must therefore go into the dashboard's folder (www/dashboard/local/…).- WebKit / iPad: the Curtains view uses WebGL (three.js) and frees its context when you leave the view — keep it that way, iPads allow only a few contexts. Keep pictures at the listed sizes (memory). The intro needs WebGL; without it the house simply appears.
- Large installations: subscribe per view (
useEntities([...])), never all states;useRealLightsreads/api/statesevery 30 s for the Lights On list only. - History-heavy views (Energy, Animals timelines) ask
/api/history/periodwithminimal_response; if their recorder keeps less than 7 days, the 7-day timeline is shorter. - prefers-reduced-motion: the intro, view entrances and weather animations are skipped or frozen.
- Rain radar uses the free RainViewer tiles (internet needed); offline it just shows the map.
- Japanese fonts load from Google Fonts only when 日本語 is switched on; English makes no outside requests besides the radar.
- Login (mode A): open the dashboard from the same address you log in at (not IP one day, hostname the next).
- Not in a live build: the demo's time/weather URL parameters (
?t=,?wx=) and the dashboards.casa bridge. - Old tablets: needs Safari 16.2+ / Chrome 111+ or newer (CSS
color-mix()); older kiosk browsers show wrong colours.
13. Licences
- Code: MIT — see
LICENSE("Copyright (c) 2026 dashboards.casa"). The go-live kit is part of it. - Fonts: SIL Open Font License 1.1, each licence next to its font:
static/fonts/LICENSE-oswald.txt,LICENSE-archivo.txt,LICENSE-manrope.txt,src/assets/fonts/LICENSE-shippori-mincho-b1.txt,LICENSE-zen-kaku-gothic-new.txt. The full Japanese character sets of the last two load from Google Fonts (same licence). - Pictures of the made-up home (house, garden, rooms, window views, cats, camera stills, covers, icons, gear drawings, textures): made for this demo; free to use, change and share, as examples or placeholders.
- npm packages: their own licences (React, three.js, Material Design Icons, home-assistant-js-websocket, Vite,
TypeScript …) —
npm lslists them.