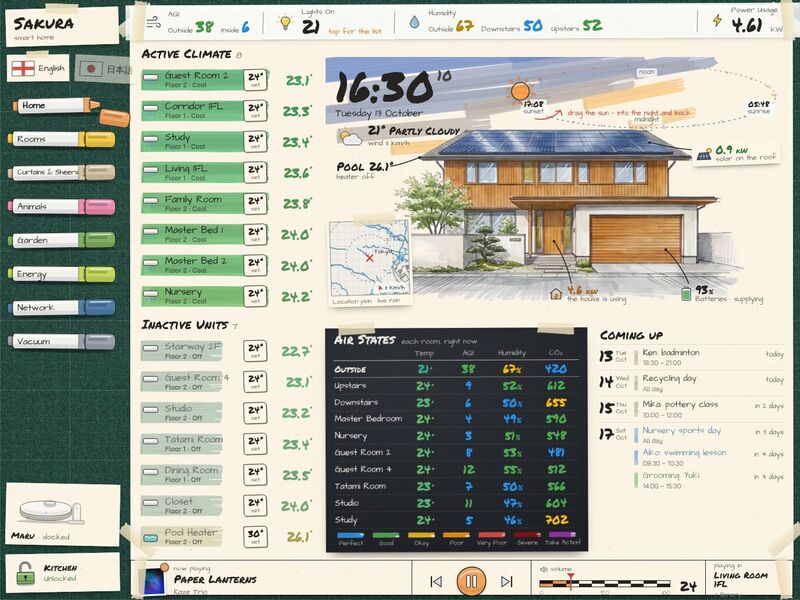
You are setting up Marker, a wall-tablet dashboard for Home Assistant, on somebody's own home. This guide is written for you, the coding agent. Work through it in order: run the demo, map their entities, go live, then make the pictures of their house. Everything you need is in this package; nothing here needs an account or an API key.
What you're building
Marker turns a tablet into an architect's presentation board for the home. The Home page shows the house drawn as an alcohol-marker render under a hand-drawn sky that follows the real sun (drag the sun along its loop to preview the evening and back); solar power, battery, the house's own use and the pool are lettered onto the drawing, lit windows glow after dark, a cat sits on the window sill of the room it is in, and the weather is drawn in (clouds, rain, fog, snow, lightning). Around it: the climate list, air quality by area, and the calendar. Further pages: Rooms (marker drawings of each room, lit or greyed by its light, A/C and curtain state), Curtains & Sheers (each window drawn, with real-looking curtains that open and close in 3D), Animals (where each cat is, how it spends its day, litter boxes, camera sightings), Garden (a site plan with every garden light), Energy (today drawn by the hour, totals and savings), Network (the network drawn as kit on a plan) and Vacuum (the robot's map). English ⇄ 日本語 switch included.
Marker on a 13-inch tablet
(The still is docs/still.jpg: the made-up demo home "Sakura Home" in Tokyo.)
The person needs: Home Assistant 2024.1 or newer (the live mode uses the standard WebSocket API and
weather.get_forecasts), a wall tablet or any browser, and the entities they want to show. Nothing else: no Home Assistant app
(add-on) or custom integration is required. Time: demo running in 10 minutes; mapping + going live 2–4 hours for a typical
home (longer if they have many rooms); pictures half a day (free AI tools) to a few days (3D model or illustrator).
What's in this package
.
├── HANDOFF.md            this guide
├── README.md             what this is, in three lines
├── LICENSE               MIT, for the code
├── package.json          exact versions this was built with; scripts dev, dev:live, build, build:live
├── vite.config.ts        dev server (+ the Home Assistant proxy for mode C) and builds
├── tsconfig.json  index.html  .gitignore
├── .env.example          copy to .env.live for live mode
├── panel-loader.js       mode B: the module Home Assistant loads for a sidebar panel
├── live/README.md        the go-live kit's own notes (modes A, B, C, troubleshooting)
├── docs/
│   ├── still.jpg         the demo's look
│   └── prompts/          prompt templates for every picture (style.txt first)
├── tools/
│   ├── pictools.py       picture processing: split sheets, cut out the house, night / "lights off" versions, thumbs
│   ├── anchors.html      open in a browser: measure windows, lamps and perches on your pictures
│   └── entities.mjs      lists every entity id the code uses, or only the ones their Home Assistant lacks
├── static/               served as-is at the site root
│   ├── fonts/            Oswald, Archivo, Manrope (+ OFL licences)
│   ├── local/            icon.png, small SVG icons, pets/ (cat faces), snapshots/animals/ (camera sightings),
│   │                     network/assets/gear/ (network kit drawings)
│   └── demo/             demo only: camera stills and album covers
└── src/
    ├── main.tsx          start-up switch: demo / live / sidebar panel
    ├── main.demo.tsx     demo entry: the made-up home, no network
    ├── main.live.tsx     live entry (modes A and C)       main.panel.tsx   sidebar-panel entry (mode B)
    ├── App.tsx  app/views.tsx      the pages and their order
    ├── config/           ← what you edit to map their home (see Step 2)
    ├── ha/               types.ts (HaBackend interface), HaProvider.tsx (hooks), wsBackend.ts / hassBackend.ts /
    │                     authFetch.ts (live), mockBackend.ts (demo)
    ├── views/            one file per page
    ├── components/       home/ (house hero, sky, sun loop, weather, location plan, cat cameo), rooms/, curtains3d/
    │                     (three.js curtain engine), animals/, energy/, music/, shell/ (sidebar, top strip, media bar)
    ├── lib/              sky.ts (sun/moon maths, home location), daylight.ts, hourly.ts (forecast), useHistory.ts,
    │                     networkData.ts (network model), tokyoGeo.ts (map lines), epoch.ts, music.ts …
    ├── i18n/             i18n.tsx, ja.ts (English → Japanese), ja-fonts.ts (Japanese fonts, loaded only for 日本語)
    ├── styles/           theme.css (tokens), marker.css (the look), night.css (night board), fonts
    ├── assets/           render/ (house, garden), rooms/, curtains/, curtain-thumbs/, cats/, tex/, fonts/
└── demo/ the made-up home: sandbox, clock, synthetic day, snapshot, weather, demo bridgeRun the demo first
Prove the toolchain before touching their house (Node 18 or newer):
npm install
npm run dev            # prints http://localhost:5173 — open it
The made-up home runs with no Home Assistant at all: src/demo/ fakes every entity, history, calendar and
forecast, and src/demo/sandbox.ts blocks every network request except fonts and the rain radar. Try the sun loop on
the Home page (drag the sun into the night), the 日本語 switch, and every page in the sidebar. Demo-only URL options:
?t=21:15 (time of day), ?wx=rainy (weather: sunny, partlycloudy, cloudy, rainy, pouring, lightning-rainy, fog,
snowy), ?lang=ja. On dashboards.casa the page around the demo sets time and weather through src/demo/bridge.ts
(a postMessage bridge); it only exists in the demo.
npm run build makes the same demo as static files in dist/.
How it works
Data flow. Every page talks to Home Assistant through one interface, HaBackend (src/ha/types.ts):
getStates, subscribe(entityIds, cb), callService, callServiceResponse, browseMedia. HaProvider
(src/ha/HaProvider.tsx) wraps it in hooks: useEntity(id), useEntities(ids), useCallService(),
useCallServiceResponse(), useBrowseMedia(). Views never know which backend is behind the hooks:
| Backend | File | Used by |
|---|---|---|
| mock (made-up home, no network) | src/ha/mockBackend.ts + src/demo/* + src/lib/mockApi.ts | npm run dev / npm run build |
| WebSocket (HA login or a token) | src/ha/wsBackend.ts | modes A and C (main.live.tsx) |
hass object from HA's sidebar | src/ha/hassBackend.ts | mode B (main.panel.tsx) |
A few things are fetched over REST with the same token (src/ha/authFetch.ts adds it): history
(/api/history/period, energy chart and cat timeline), calendars (/api/calendars/<id>), camera pictures
(/api/camera_proxy/<id>). Each page subscribes only to its own entities (important for big installations).
Config. Entity ids live in src/config/* (and a handful of constants at the top of a few components — all listed
in Step 2). Room names and layout are data, not code.
Time and the sky. src/lib/sky.ts computes the sun and moon for the home's latitude/longitude (LAT, LON) and
reads the tablet's wall clock as the home's local time (TYO = the home's UTC offset in ms). Everything that changes
with the time of day reads the sun from there: the Home page sky, the day/night house, the night board
(data-phase on <html>, src/styles/night.css), the Garden and Curtains day/night pictures.
Language. src/i18n/i18n.tsx: t("English text") looks the string up in src/i18n/ja.ts (a plain
{ "English": "日本語" } object); missing keys fall back to English. To add a language: copy ja.ts to e.g.
de.ts, translate the values, extend type Lang and the toggle in src/components/shell/LangToggle.tsx, and pick
the dictionary by language in i18n.tsx. Japanese web fonts are loaded only when 日本語 is switched on
(src/i18n/ja-fonts.ts); a new language with non-Latin script needs the same treatment.
Theming. Colours and paper are CSS custom properties in src/styles/theme.css (--paper, --ink, the
--m-* marker colours …); the hand-drawn look (marker strokes, tape, pencil rules) is src/styles/marker.css plus
the SVG helpers in src/components/draw/ (MarkerStroke, InkRule, InkBox, Squiggle, Tape). Fonts:
Permanent Marker (headings), Architects Daughter (hand notes), a Latin sans for body text, Oswald / Archivo /
Manrope for figures (src/styles/marker-fonts.css, src/styles/fonts.css).
How the pictures are layered. The art is a set of marker renders of the same home that the code stacks and blends by time, light state and weather:
- Home hero (
src/components/home/HouseHero.tsx, stage 1640 × 916): the house is a transparent cut-out drawn twice, day (render/house.webp) and night (render/house-night.webp), in exact register. The night copy fades in with the night factornf(0 while the sun is ≥ 1° up, 1 below about −8°). Behind the house: ten marker strokes of sky, coloured from morning/evening keyframe tables by the sun's altitude, plus clouds and stars. In front: a dusk wash (multiply, masked by the house's own alpha), lit windows (marker strokes over the rectangles inWINDOWS, one per room light, glowing after dark), the front-garden and pool glows, weather layers (WeatherFx.tsx), rain, the lettering (clock, weather, pool, solar, battery, house use, leader lines), the sun loop and the cat cameo. Positions are fractions of the 1640 × 916 stage: re-measure them on your own house (Step 4). - Garden (
views/GardenView.tsx): a top-down site plan, day and night versions in register, swapped at dusk; each light is a glow at a point (config/gardenLights.ts,at: [x, y]fractions). - Curtains (
views/CurtainsSheersView.tsx+components/curtains3d/engine.ts): each window is a drawn plate (day/night,assets/curtains/<room>-day|night.webp) behind three.js curtains/sheers/blinds;glassinconfig/curtains3d.tsmarks the window opening on the plate ([0,0,1,1]= the whole plate); the weather picks a lighting preset (overcast, wet, storm) with rain and lightning on the glass. - Rooms (
components/rooms/RoomCard.tsx): one drawing per room, shown in colour when its light is on and as the greyscale-offcopy when it is off.
Step 1 — Inventory their Home Assistant
- Ask the person for their Home Assistant address (e.g.
http://homeassistant.local:8123) and a long-lived access token (Home Assistant → their profile → Security → Long-lived access tokens → Create). Keep the token out of any file you commit or build. - Dump their states:sh(Without a terminal: Developer Tools → States in Home Assistant shows the same list.)
curl -s -H "Authorization: Bearer $HA_TOKEN" http://homeassistant.local:8123/api/states > states.json - See what the dashboard needs and what they lack:sh
node tools/entities.mjs > needed.csv # every entity id the code uses, with file:line node tools/entities.mjs --missing states.json # only the ids their Home Assistant does not have - Group their entities by area and domain (
light,switch,climate,cover,sensor,media_player,vacuum,lock,camera,calendar,weather,sun). Agree with the person which pages they want; it is normal to drop pages (Network, Vacuum, Animals, Garden, Energy all depend on kit they may not have).
The domains Marker uses: light, switch, climate, cover (optional, see Curtains), script, button,
input_number, input_text, input_datetime, sensor, media_player, vacuum, select, lock, camera,
calendar, weather, sun, tts.
Step 2 — Map entities
Every id in the code is the made-up home's (<domain>.sk_…; the cats' sensors are sensor.<cat>_…). Replace them
with theirs in the files below. After each file, run node tools/entities.mjs --missing states.json again; when it
prints nothing the mapping is complete. If they don't have something, remove the card or page as described in the
last column — don't leave ids that don't exist (those cards show dashes).
Shell and Home page — src/config/entities.ts
| Key | What it is | Domain | State / attributes used | Services called | Demo id | If they don't have it |
|---|---|---|---|---|---|---|
SHELL.media | speaker in the bottom media bar and music popup | media_player | state, media_title, media_artist, media_album_name, entity_picture, media_duration, media_position (+_updated_at), volume_level, shuffle, group_members, source | media_player.media_play_pause, media_next_track, media_previous_track, media_seek, volume_set, shuffle_set, play_media, join, unjoin | media_player.sk_living_speaker | delete <MediaBar /> in components/shell/AppShell.tsx |
SHELL.vacuum, SHELL.vacuumState | robot card in the sidebar | vacuum, sensor | vacuum state + battery_level; operation state | (see Vacuum) | vacuum.sk_maru, sensor.sk_maru_state | delete the robot card in components/shell/Sidebar.tsx |
SHELL.lock | door lock card in the sidebar | lock | locked / unlocked | lock.lock, lock.unlock | lock.sk_kitchen_door | delete the lock card in Sidebar.tsx |
TOPSTRIP.aqiOutside, aqiInside | air-quality figures in the top strip | sensor | number | — | sensor.sk_outside_aqi, sensor.sk_downstairs_aqi | delete that cell in components/shell/TopStrip.tsx |
TOPSTRIP.humOutside, humDownstairs, humUpstairs | humidity figures | sensor | number (%) | — | sensor.sk_outside_humidity … | delete the cell |
TOPSTRIP.power | "Power usage" figure | sensor | number, kW | — | sensor.sk_house_power | delete the cell |
CLIMATE[] | Active / inactive climate list (Home) | climate | state (hvac mode), current_temperature, temperature | climate.set_temperature, climate.set_hvac_mode | climate.sk_ac_living … (15) | remove rows; empty list → remove <ClimateList /> from views/HomeView.tsx |
AREAS[] | "Air states" table: temp, AQI, humidity, CO₂ per area | sensor | numbers | — | sensor.sk_upstairs_temperature … | remove rows or set co2 undefined |
CALENDARS[] | "Coming up" agenda (colour per calendar) | calendar | REST /api/calendars/<id>?start&end | — | calendar.sk_family … (5) | remove entries |
WEATHER | condition, temperature, wind on the hero; hourly forecast while previewing | weather | state, temperature, wind_speed, wind_bearing; weather.get_forecasts (hourly) | weather.get_forecasts (response) | weather.sk_tokyo | any weather integration works (Met.no is built in) |
The lights-on count in the top strip counts their light.* entities that are on (lib/useRealLights.ts); no
entity needed. TOPSTRIP.lightsOn and FLOOR_VIEW / CAT_ACTIVITY_VIEW are unused leftovers — ignore them.
Home hero — constants at the top of src/components/home/HouseHero.tsx
| Constant | What it is | Domain | Demo id | If they don't have it |
|---|---|---|---|---|
L.poolLight | pool light (glow at night) | switch / light | switch.sk_garden_pool_steps | delete the glow-pool div |
L.frontGarden | front-garden light (glow by the door at night) | switch / light | switch.sk_garden_front_pine | delete the glow-front div |
L.heater, L.poolProbe | pool heater (steam when heating) and water temperature | climate, sensor | climate.sk_pool_heater, sensor.sk_pool_temperature | delete the anno-pool block and its leader line |
EN.solar, EN.batt, EN.load | solar now (kW), battery level (%), house use now (kW) | sensor | sensor.sk_solar_power, sensor.sk_battery_level, sensor.sk_house_power | delete the matching en-tag block |
WINDOWS[].id | the light that lights each drawn window | light | light.sk_1f_tatami … (8) | delete entries (and re-measure b on their house: Step 4) |
sun.sun | above/below horizon | sun | sun.sun | always present |
Rooms — src/config/rooms.ts
ROOMS[], one entry per card: name (upper case, shown on the card, also the key for its drawing in
components/rooms/RoomCard.tsx KEY), floor ("1st"/"2nd"), light (light, toggle + turn_on with
brightness_pct; brightness), climate (climate: state, current_temperature), sheer / blackout (shows
"sheers/curtains open/closed": an on/off switch or a cover — open/opening count as open), temp /
humidity (sensors), lock (lock), featureLight (an extra light with its own on/off icons). Any field may be
null.
ROOM_AC[name][] (the A/C chip on a room card): helper = an input_number target temperature (the card calls
input_number.increment / decrement), script = a script that switches that A/C on/off (script.turn_on). The
made-up home drives its A/C through these helpers. If theirs don't exist, create them in the UI — Settings → Devices &
services → Helpers → Create helper → Number (min 16, max 30, step 1, °C) — and a script per A/C (Settings →
Automations & scenes → Scripts → Add script → ⋮ → Edit in YAML), then an automation so the target follows the helper:
# Script: A/C on/off for one room (create in the UI, paste in "Edit in YAML")
alias: Living A/C on/off
mode: single
sequence:
  - if:
      - condition: state
        entity_id: climate.living_ac
        state: "off"
    then:
      - action: climate.set_hvac_mode
        target:
          entity_id: climate.living_ac
        data:
          hvac_mode: cool
      - action: climate.set_temperature
        target:
          entity_id: climate.living_ac
        data:
          temperature: "{{ states('input_number.living_ac_target') | float(24) }}"
    else:
      - action: climate.turn_off
        target:
entity_id: climate.living_ac# Automation: the dashboard's +/- buttons set the A/C (create in the UI, paste in "Edit in YAML")
alias: Living A/C target follows the dashboard
mode: restart
triggers:
- trigger: state
entity_id: input_number.living_ac_target
conditions:
- condition: not
conditions:
- condition: state
entity_id: climate.living_ac
state: "off"
actions:
- action: climate.set_temperature
target:
entity_id: climate.living_ac
data:
temperature: "{{ trigger.to_state.state | float }}"Simpler alternative (no helpers): in RoomCard.tsx, make the A/C chip call climate.set_temperature /
climate.toggle on the room's climate directly — the card already reads that entity.
Curtains & Sheers — src/config/curtains3d.ts
ROOMS3D[], one entry per window: key (also the picture names assets/curtains/<key>-day|night.webp and
assets/curtain-thumbs/<key>.webp), name, floor, cover ("curtains" | "roller" | "venetian" + ven.slats),
outdoor (true = the view outside gets weather and rain), baseHex (fabric colour), curtainS / sheerS (seconds a
run takes, for the animation), glass (window opening on the plate, fractions), types[] (the controls). Three kinds
of control are supported:
kind | Fields | Reads | Calls | Use when |
|---|---|---|---|---|
"cover" | entity | cover.* state (open, opening, closing, closed) | cover.toggle | most homes — any normal curtain/blind motor |
"scripted" | open, dir, script | open = a switch/input_boolean on; dir = opening/closing/idle | script.turn_on | motors driven by a script (the made-up home) |
"buttons" | openLed, closeLed, openBtn, closeBtn | two indicator switches | button.press | open/close push-button controllers |
Example for an ordinary cover: types: [{ kind: "cover", label: "Curtains", entity: "cover.living_curtains" }].
Weather (weather.* state) and sun.sun pick the scene; no other entities. A window they don't have: delete its entry
(and its pictures). src/config/curtains.ts is demo-only (the mock uses it to simulate motors) — ignore it.
Animals — src/config/animals.ts
| Key | What it is | Domain | Demo id | If they don't have it |
|---|---|---|---|---|
CATS[] | id, name, photo (face, static/local/pets/<id>.webp) | — | mochi … ren | — |
roomSensor(cat) = sensor.<id>_room | the room the cat is in; the state must be one of the ROOM_RATIO keys (or away) | sensor | sensor.mochi_room | the cameo and "where now" disappear |
ratioSensor(cat, period, room) = sensor.<id>_room_ratio_<7d|today>_<room> | % of time per room | sensor | sensor.mochi_room_ratio_today_kitchen_1 | the donut is empty |
ROOM_RATIO[] | the room keys of their tracker (key), the label and colour shown | — | kitchen_1, genkan … | — |
LITTER_BOXES[] | litter box state + occupied | sensor | sensor.sk_litter_cat_room_state … | remove entries |
SPOTTINGS[] | last camera sightings: picture, camera name, time | input_text, input_datetime + a picture | input_text.sk_spotting_1_camera | remove entries |
The cat sensors come from a room-presence tracker (e.g. the Bermuda integration or Room Assistant: one Bluetooth tag per pet).
The _room sensor is usually the tracker's own; the ratio sensors can be made with the built-in History stats
helper (Settings → Helpers → Create helper → History stats: entity = the _room sensor, state = the room key, type
ratio, start = midnight / 7 days ago). The cat perches on the house drawing are CAT_PERCH in
components/home/CatCameo.tsx (per room key, percent of the stage). No pets: remove the Animals entry from
app/views.tsx and <CatCameo /> from HouseHero.tsx.
Garden — src/config/gardenLights.ts
GARDEN_LIGHTS[]: id (switch or light), label, at: [x, y] (fractions of the plan picture), glow (size).
The page calls homeassistant.turn_on/turn_off (all) and <domain>.turn_on/turn_off (one). No garden lights: remove
the Garden entry from app/views.tsx.
Energy — constants at the top of src/views/EnergyView.tsx (and EN in HouseHero.tsx)
| Constant | What it is | Unit | Demo id |
|---|---|---|---|
gridPower, solarPower, loadPower | power now (charts use their history) | kW | sensor.sk_grid_power, sensor.sk_solar_power, sensor.sk_house_power |
batt | battery level | % | sensor.sk_battery_level |
gridKwh.today/week/month | grid import | kWh | sensor.sk_grid_import_daily … |
solarKwh.today/week/month | solar production | kWh | sensor.sk_solar_energy_daily … |
battKwh.today/week/month | battery discharge | kWh | sensor.sk_battery_export_daily … |
savings.* | money saved (today, yesterday, last week, last month, year) | currency | sensor.sk_savings_today … |
- Power sensors must report kW. If theirs report W, open the entity in Home Assistant → ⚙ settings → Unit of measurement → kW (Home Assistant converts it; no template needed).
- No whole-house power sensor? Create the built-in helper Combine the state of several sensors (type sum) over their circuit sensors.
- Daily/weekly/monthly kWh: built-in Utility meter helpers (one per period: daily, weekly, monthly) on their energy (kWh) sensors.
- Savings: a Template helper (Settings → Helpers → Create helper → Template → Template sensor), e.g. today's
self-consumed solar times their tariff plus export times the feed-in rate:
{{ ((states('sensor.solar_energy_daily') | float(0) - states('sensor.grid_export_daily') | float(0)) * 0.31 + states('sensor.grid_export_daily') | float(0) * 0.16) | round(0) }}— or delete the savings card. No solar or battery: delete those tags/legend items; the chart copes with missing series.
Network — src/lib/networkData.ts
A model of the network as drawn kit: one gateway, switches, access points, NAS, mini PC, PDU outlets, recorder and the
cameras. Each device has ent: { cpu, mem, clients, power … } pointing at sensor.sk_net_*. Map them to their
network integration's sensors (their router's or switches' integration, OpenWrt, SNMP, Glances …) — names, models and the drawings in
static/local/network/assets/gear/ are generic. Most homes will rather delete the page: remove the Network entry from
app/views.tsx.
Vacuum — src/components/vacuum/vacuumModel.ts, src/config/vacuumAreas.ts, src/config/plan.ts
VAC (vacuum: state, battery_level; services vacuum.start, pause, stop, return_to_base, locate),
MODE (select: select.select_option), OP_STATE / OP_ERROR (sensors), IDENTIFY (button). plan.ts holds
the floor plans (polygons per room, units of the drawing) and vacuumAreas.ts the cleaning areas — redraw both for
their home or remove the Vacuum page.
Music — src/components/music/useMusicData.ts, src/lib/music.ts
The music popup lists the speakers in useMusicData.ts and uses the media player services above. Library search and
favourites call a musicplus.* service with a response — a custom service that is not part of Home Assistant;
without it those panels stay empty. Playback, volume and grouping work with any media_player.
Step 3 — Go live
The go-live kit is already wired in (src/main.tsx switches on VITE_HA_MODE); its own notes are in
live/README.md. Pick one mode:
- A — inside Home Assistant (recommended).
cp .env.example .env.live(keepVITE_HA_MODE=live,BASE=/local/dashboard/),npm run build:live, copy everything indist/to<config>/www/dashboard/on the Home Assistant machine (Samba or File editor / Studio Code Server apps, orscp), openhttp(s)://<home-assistant>:8123/local/dashboard/index.htmlon the tablet and log in once. Files inwww/are public on their network — a build never contains the token (the config refuses to bake one in). - B — a page in Home Assistant's sidebar. Mode A's build plus
panel-loader.jsin the same folder, and thepanel_custom:block from the top ofpanel-loader.jsinconfiguration.yaml(a YAML-only integration: back the file up, then Developer Tools → YAML → Check configuration, then restart). - C — development against their Home Assistant.
.env.livewithVITE_HA_TARGETandVITE_HA_TOKEN, thennpm run dev:live. The dev server proxies/apiand signs with the token: keep it on their own network.
Files to swap/delete once live (optional; a live build already leaves the demo code out): src/demo/,
src/ha/mockBackend.ts, src/lib/mockApi.ts, src/main.demo.tsx, src/config/curtains.ts (demo-only), the
else { import("./main.demo") } branch in src/main.tsx, and static/demo/. The demo bridge (src/demo/bridge.ts)
goes with src/demo/.
Set the home's location and time zone for the sky: in src/lib/sky.ts LAT, LON and TYO (their UTC offset in
ms, e.g. 1 * 3600000 for UTC+1). TYO is fixed: where clocks change for daylight-saving time, compute it for the
current date instead (e.g. from Intl.DateTimeFormat with their timeZone) or update it twice a year. Also LAT/LON and the two labelled points (AIRPORT, CITY) in
components/home/LocationPlan.tsx, whose map lines (lib/tokyoGeo.ts) are the demo city's rivers and coast: replace
them with their own (an Overpass query for waterway=river and natural=coastline around their home, projected the
same way) or delete the SEA/COAST/RIVERS paths. The rain radar (RainViewer) follows LAT/LON by itself.
Step 4 — Pictures
Every picture the app uses. keep = generic, works for any home. replace = it shows the made-up home, its rooms, garden or pets: the person's own versions make the dashboard theirs (until then the made-up ones keep working).
| Path | Size (px) | Role | |
|---|---|---|---|
src/assets/render/house.webp | 1640 × 916, transparent | the house, day (Home hero) | replace |
src/assets/render/house-night.webp | 1640 × 916, transparent | the same house at night, in exact register | replace (derive) |
src/assets/render/garden-day.webp | 2100 × 900 | Garden site plan, day | replace |
src/assets/render/garden-night.webp | 2100 × 900 | the same plan at night, in register, lamps off | replace (derive) |
src/assets/rooms/<key>.webp × 18 | 760 × 425 | Rooms cards, light on | replace |
src/assets/rooms/<key>-off.webp × 18 | 760 × 425 | the same, light off (greyscale) | replace (derive) |
src/assets/curtains/<room>-day.webp × 17 | 1200 × 896, 1264 × 848 or 896 × 1200 | window plates behind the 3D curtains, day | replace |
src/assets/curtains/<room>-night.webp × 17 | same as its day plate | the same window at night, in register | replace (derive) |
src/assets/curtain-thumbs/<room>.webp × 17 | 220 × 165 | window picker thumbnails | replace (derive) |
src/assets/cats/<id>.webp × 6 | ≈ 215 × 320, transparent | the cats perched on the house | replace (their pets) |
static/local/pets/<id>.webp × 6 | 512 × 512 | cat faces (Animals page, popups) | replace |
static/local/snapshots/animals/spotting-1.jpg, -2.jpg | 1273 × 720 | latest camera sightings | replace (an automation can save camera snapshots there) |
static/local/icon.png | 512 × 512 | home-screen icon | replace if they like |
static/local/network/assets/gear/*.png × 11 | ≈ 250 × 252 | network kit drawings | keep |
static/local/*.svg | — | light, dining-light and litter-box icons | keep |
src/assets/tex/paper.webp, matgrain.webp | 256², 360² | paper texture, desk grain | keep |
src/assets/fonts/*, static/fonts/* | — | fonts (licences next to them) | keep |
static/demo/camera/*.jpg, static/demo/music/*.jpg | — | demo only (camera stills, album covers) | delete when live |
The look. Architect's alcohol-marker presentation renders: black fineliner outlines that overshoot a little, bold marker strokes with visible direction, cool and warm greys for shade, selective colour (timber, greens, glass), white gel-pen highlights, white paper showing through. Every picture of one home must look like one hand drew them: same style text, same model, same seed/settings, and one style reference for the whole set.
Best route for this look: a free 3D model of their home → plain renders → marker-style image-to-image.
- Model the house roughly in Sweet Home 3D (free; draw walls on the plan, drop in windows, doors and furniture; it renders 3D views) or Blender (free). Accuracy beats detail: the right roof, windows and doors in the right places is what makes it their house.
- Render (white background, soft daylight, no sky): the street front straight on, slightly elevated, the house filling the middle two-thirds of a 16:9 frame (→ house); the garden straight down, orthographic (→ site plan); each room at eye level, 16:9 (→ room cards); each curtained window from inside, at the plate's aspect (→ curtain plates). A photo of the real thing from the same viewpoint works too (it's their home).
- Turn each render into a marker drawing with image-to-image at denoise/strength 0.45–0.6 (keeps the geometry)
and the prompts in
docs/prompts/(start withstyle.txt). For rooms and window plates, put four renders on one 2 × 2 sheet and stylise the sheet in one go — the four come out in the same hand — then split it withtools/pictools.py split. - Night versions: stylise the day picture again with the night prompt at low strength (0.35–0.5) so it stays in
register, or derive them in code:
python3 tools/pictools.py night day.webp night.webp.
Free alternatives to the paid image generator the made-up home's pictures came from (any of these can do steps 3–4):
- Local, no account: FLUX.1 [schnell] or SDXL in ComfyUI or Forge (image-to-image; add a ControlNet lineart/canny from the render to lock the geometry, and an IP-Adapter / style reference image for consistency); Draw Things on a Mac/iPad does the same.
- Free tiers: Google Gemini (image editing: "redraw this render as …" keeps the composition well), ChatGPT's free image tier, Microsoft Designer / Bing Image Creator, Ideogram, Leonardo, Adobe Firefly, Krea. Chat-style editors take the render as input; keep one conversation per set so the style stays put.
- No AI: their own photos with a "marker / sketch" filter (most photo editors), the 3D renders as they are (clean "white model" look — set the paper colour to match), or an illustrator: architectural marker rendering is a classic commission, and the specs below are the brief.
Exact specs per group
- House (
house.webp,house-night.webp): 1640 × 916, the house cut out on transparency, sky left empty (the app paints sky, sun, clouds and weather behind it). Keep the house in the middle with paper around it: the sun loop occupies the top right, the clock the top left, the energy notes the bottom corners. Generate on plain white paper, thenpython3 tools/pictools.py cutout house.png src/assets/render/house.webp --size 1640x916 --night src/assets/render/house-night.webp. Then re-measure, withtools/anchors.html(boxes and points on the 1640 × 916 picture) andcomponents/home/hero.cssopen:WINDOWS[].binHouseHero.tsx— one[x0, y0, x1, y1]per lit window pane, and the light that lights it;.glow-front(front-garden light),.glow-pool(pool),.anno-pool,.en-solar,.en-batt,.en-housepositions inhero.css(percent of the stage) and the fourhero-leaderspaths inHouseHero.tsx(1640 × 916 coordinates: from each note to what it labels: roof panels, battery, door, pool);CAT_PERCHinCatCameo.tsx(percent; window sills, the doorstep, the canopy roof).
- Garden plan (
garden-day/-night.webp): 2100 × 900, top-down, the house's rear edge on the left; night = the same drawing with dark washes and all lamps off (the app draws the glows). Thenatfor every light inconfig/gardenLights.ts(points intools/anchors.html). - Rooms (
rooms/<key>.webp+-off): 760 × 425 (16:9), lights on, vignetted into the paper.split … --offwrites both. Keys:KEYinRoomCard.tsx. - Curtain plates (
curtains/<room>-day/-night.webp+ thumbs): the window wall from inside, the window filling the plate (glass: [0, 0, 1, 1]); if the window is smaller, measure its opening on the plate and setglass. Day and night must be in exact register.pictools.py thumbmakes the thumbnail. - Pets (
cats/<id>.webp,static/local/pets/<id>.webp): whole-body marker figures on transparency (≈ 320 px tall,pictools.py trim), and a 512 × 512 face. Their own pet photos are the best references.
tools/pictools.py needs Python 3.8+ and Pillow (pip install pillow); every command is listed at the top of the
file. All outputs are WebP without metadata. Larger pictures than the sizes above only cost memory on the tablet.
Step 5 — Build & run
npm run build:live        # live build → dist/ (BASE from .env.live, e.g. /local/dashboard/)
npm run build             # demo build → dist/ (made-up home)
npm run preview           # serve dist/ locally to check it
Host it inside Home Assistant (mode A/B, above) or on any static web server on their network (then the tablet logs in to Home Assistant from that page; same-origin with Home Assistant is simplest).
Wall tablet. Designed for 1376 × 1032 CSS px, landscape (a 13-inch tablet); 1366 × 1024 and up fits as is.
Smaller screens (e.g. 1180 × 820) work but feel cramped — set the kiosk browser's zoom to ~85 % or add
html { zoom: 0.86 } in src/styles/app.css. Portrait is not supported.
- Android: Fully Kiosk Browser (start URL, keep screen on, motion/schedule screen-off, hide the address bar).
- iPad: open the page in Safari → Share → Add to Home Screen (full screen), then Guided Access (Settings → Accessibility) to lock it; Display & Brightness → Auto-Lock → Never while on the charger.
- Keep it charging; lower the brightness at night (the board turns dark by itself after sunset).
Step 6 — Verify
Tick each item on the real tablet:
- Every page renders; no card shows
—for an entity that should have a value (node tools/entities.mjs --missing states.jsonreports 0 missing, apart from pages they chose to drop). - Home: the clock shows their local time; the sky, the night house and the dark board change at their sunset
(check
LAT/LON/TYO); the weather line matches their weather entity; the solar / battery / house figures match Home Assistant. - A room light toggled on the Rooms page changes in Home Assistant (and the window on the house lights up at night); the A/C +/− and on/off work.
- Curtains open/close the right motors; the state follows when moved from elsewhere.
- Garden lights, lock, vacuum buttons and the media bar call the right services (Home Assistant → Settings → System → Logs shows no errors from those calls).
- Energy chart shows today's history; calendar shows the next events.
- Browser console: no errors (remote-debug the tablet: Safari Web Inspector / Chrome
chrome://inspect). - Performance: page changes feel instant; the Curtains page (three.js) loads in a second or two; memory stays flat after an hour (Safari: Develop → the tablet → Timelines).
- Night: after sunset the board is dark, windows glow where lights are on, nothing glares.
Make it theirs
- Names and rooms: room names are data (
config/rooms.ts,config/curtains3d.ts,config/entities.ts); pages and their order:app/views.tsx(delete an entry to remove a page; the sidebar follows). The brand in the sidebar (components/shell/Sidebar.tsx) and the page title / icon (index.html,static/local/icon.png). - Colours and fonts: tokens in
styles/theme.css, night palette instyles/night.css, the marker colour per page (CAT_MARKERinSidebar.tsx), fonts instyles/marker-fonts.css/styles/fonts.css. - Language: see How it works → Language. Japanese can be dropped by removing
<LangToggle />fromcomponents/shell/Sidebar.tsx. - Units: temperatures are shown as received (°C or °F both work); power must be kW; money uses the symbol in the
Energy page (
¥inviews/EnergyView.tsx) — change the symbol there. - Pictures: Step 4. Start with the house: it is what makes the board feel like their home.
Gotchas
- iPad / WebKit: use Safari or a Home-Screen web app; test on the real tablet — desktop Chrome hides WebKit
issues (e.g.
mask-imageneeds the-webkit-prefix, already in the CSS). The Curtains page uses WebGL; older iPads (3 GB RAM or less) may reload the page when other tabs are open — keep the kiosk to this page. - Memory: pictures are WebP sized for the stage; don't drop in 4K renders. The rain and snow canvases stop when the page changes.
- Large Home Assistant instances: keep
useEntities([...])per view (never subscribe to all states). - Time zone: the sky uses the tablet's wall clock + the home's offset (
TYOinlib/sky.ts); a tablet set to another time zone shows another sky. Daylight-saving time: see Step 3. - Sun state: night views use the sun computed in
lib/sky.ts(fromLAT/LON/TYO) andsun.sun; if the two disagree (wrong location or offset), the Curtains page and the hero switch to night at different moments. prefers-reduced-motion: honoured (animations become instant; lightning shows a still bolt).- Kiosk timers: the clock runs off the tablet; a tablet that sleeps catches up when it wakes (visibility change).
- Tokens: never put a long-lived token in a build or in
www/; modes A/B use Home Assistant's own login. - Type check:
npx tsc --noEmitis clean; the synthetic-data generatorsrc/demo/synth.tsis plain JavaScript (@ts-nocheck). - Fonts: body text uses a Latin-only file under the name "Zen Kaku Gothic New"; real Japanese glyphs load from Google Fonts only when 日本語 is on.
Licences
- Code: MIT — see
LICENSE("Copyright (c) 2026 dashboards.casa"). - Fonts: each font's licence file sits next to it — Oswald, Archivo, Manrope, Architects Daughter, Bai Jamjuree:
SIL Open Font License 1.1 (
OFL-*.txt); Permanent Marker: Apache License 2.0 (LICENSE-PermanentMarker.txt). Japanese fonts are loaded from Google Fonts at run time (OFL), not shipped. - Pictures of the made-up home ("Sakura Home": house, rooms, garden, window plates, cats, icons): made for this demo; free to use as examples and placeholders.
- Map lines in
src/lib/tokyoGeo.ts: © OpenStreetMap contributors, ODbL. Rain radar: RainViewer's free API (keep their attribution visible if you publish the dashboard). - npm packages: their own licences (React, three.js, Material Design Icons, home-assistant-js-websocket, Vite …),
installed by
npm install.