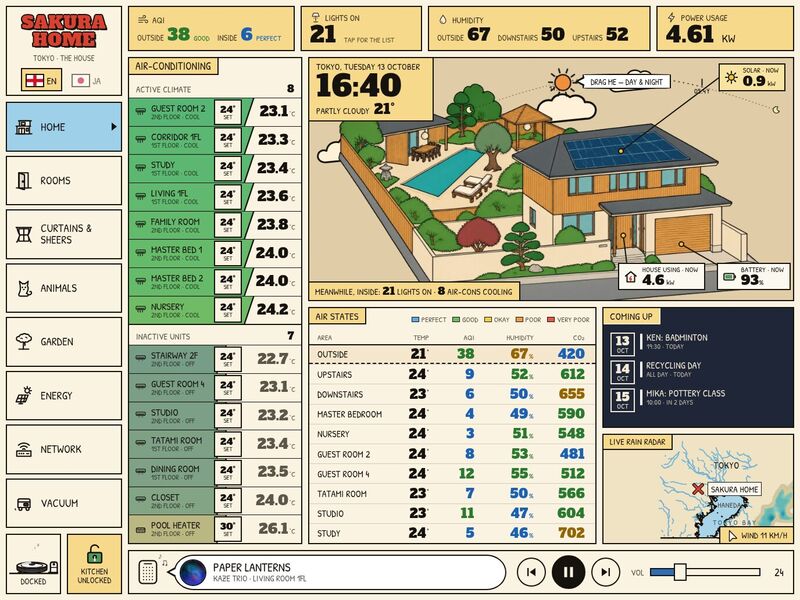
You are setting up Ligne Claire, a wall-tablet dashboard for Home Assistant drawn like a clear-line comic album, on the Home Assistant of the person who handed you this folder. Everything you need is in this package: the full app source, the made-up demo home it ships with, the go-live code, the picture tools and this guide. Work through the steps in order, keep the person in the loop for choices only they can make (which entities, which views, their pictures), and tick the checklist in Step 6 before you call it done.
1. What you're building
The demo home at golden hour
A full-screen, landscape, touch dashboard drawn as a comic album: black ink outlines, flat colours, speech balloons and caption boxes. The home page is a big drawing of the house under a live sky — the sun and moon run along a dotted track with the real sunrise/sunset times, and the whole page re-prints itself for dawn, day, golden hour, dusk and night (paper, ink and colours change; windows light up when their lamps are on; clouds, rain, snow, fog and lightning follow the weather). The user can drag the sun to preview any hour. Eight views: Home (house + sky, A/C list, air quality table, calendar, rain radar), Rooms (one inked room drawing per room — the colour floods in when the light is on), Curtains & Sheers (a 3D window per room with animated curtains and the real weather outside), Animals (where each pet is, time per room, litter boxes, camera "spottings"), Garden (a top-down garden plan with every outdoor light), Energy (solar/grid/battery today, totals, savings), Network and Vacuum — plus a music player, a lights-on list and an English ⇄ 日本語 switch.
What the person needs: Home Assistant (written for 2024.x and newer — it uses weather.get_forecasts,
history, calendars), a wall tablet or any browser (designed at 1376×1032 CSS pixels, scales down
automatically), and a computer with Node.js 18+ to build it. Nothing else — no add-ons or custom cards.
Time: about an hour to run the demo and inventory their entities, 1–3 hours to map entities (mostly config files), and 1–3 hours for pictures with an image AI (longer if they draw by hand).
2. What's in this package
HANDOFF.md            this guide            README.md   3-line intro            LICENSE   MIT (+ notes)
package.json          exact dependency versions + scripts (dev, dev:live, build, build:live, typecheck)
vite.config.ts        dev server (with the mode C proxy) + builds; BASE = where a build is hosted
.env.example          copy to .env.live to go live (modes A/B/C)
panel-loader.js       mode B: the module Home Assistant loads for a sidebar panel
index.html            page shell (title, home-screen icon)
tsconfig.json         TypeScript settings (npm run typecheck = 0 errors)
src/
  main.tsx            start-up switch: demo (default) · live (VITE_HA_MODE=live) · sidebar panel (?panel=1)
  main.demo.tsx       demo entry: fake clock + mock backend + demo bridge, then the app
  main.live.tsx       modes A and C: connects with wsBackend, then the app
  main.panel.tsx      mode B: gets `hass` from Home Assistant's sidebar
  App.tsx             i18n provider + shell
  app/views.tsx       the list of views (remove a line to remove a view)
  config/             EVERY entity id and every picture anchor lives here (Step 2)
    home.ts             latitude/longitude + time zone (sun, moon, plates, radar centre)
    entities.ts         media bar, sidebar, top strip, A/C list, air areas, calendars, weather
    rooms.ts            room cards (lights, A/C, curtain indicators, locks, feature lights)
    curtains3d.ts       Curtains & Sheers view (rooms, cover entities, window shape)
    garden.ts           the outdoor lights and where they sit on the garden plan
    house.ts            the home drawing: lit windows, pet perches, energy tags, sun track
    animals.ts          pets, their rooms, spottings, litter boxes
    plates.ts           which window picture goes with which weather/time
    vacuumPlan.ts       the floor plan drawn on the Vacuum view
    curtains.ts         demo only (curtain run times for the mock backend)
  ha/                 HaBackend interface (types.ts), hooks (HaProvider.tsx), backends:
                      mockBackend.ts (demo), wsBackend.ts (live), hassBackend.ts (panel), authFetch.ts
  views/              the eight views (+ their CSS)
  components/         shell (sidebar, top strip, media bar, popups), home, rooms, animals, energy, music,
                      curtains3d/engine.ts (three.js), vacuum
  lc/                 the comic-album kit: panels/captions/balloons (Lc.tsx, lc.css), icons, sky.ts (sun,
                      moon, plates), cats.ts / roomArt.ts (picture lookups), Maru.tsx (the robot drawing)
  lib/                data hooks: history, hourly forecast, calendars, lights-on, network, music, jump.ts
  i18n/               i18n.tsx (t()), ja.ts (English → 日本語), ja-fonts.ts (Japanese web fonts, loaded on demand)
  styles/             theme.css (colour tokens per plate), app.css, fonts.css
  assets/             the drawn pictures (house, garden, rooms, window views, pets) + 2 fonts (+ OFL.txt)
  demo/               the made-up home: sandbox.ts (fake clock, no network), snapshot.ts (entity states),
                      synth.ts + replay.ts (a synthetic day: solar, battery, cats), polish.ts, world.ts (time &
                      weather changes), calendar.ts, music.ts, bridge.ts (time/weather control from a parent page)
static/               served as-is: local/ (icons, fallback pictures, spotting snapshots, network gear),
                      fonts/ (3 fonts + OFL.txt), demo/ (demo camera stills + album covers)
tools/lc_art.py       turn drawings into the app's layers (ink, night/grey grades, lit windows, slicing, cut-outs)
tools/measure.html    click/drag on a picture to measure anchors (fractions) for config/house.ts & garden.ts
docs/still.jpg        the picture above
docs/ENTITIES.md      every entity id the live app uses, file by file (generated from src/)
docs/prompts/ image prompt templates for the house, garden, rooms, window views and pets3. Run the demo first
npm install          # exact versions from package.json
npm run dev          # open the address it prints (e.g. http://localhost:5173/)
The made-up home ("Sakura Home", Tokyo) runs entirely in the browser: no Home Assistant, no network calls except
the public rain-radar and map tiles (and Japanese web fonts once 日本語 is switched on). Click through all eight views, toggle a light (Rooms), open a curtain,
drag the sun on the Home drawing, switch to 日本語. Useful URL parameters (demo only):
?t=21:15 start at that time · ?wx=rainy start with that weather (any Home Assistant condition: sunny,
partlycloudy, cloudy, rainy, pouring, lightning-rainy, fog, snowy, windy, clear-night) ·
?lang=ja · ?clock=real use the real time. npm run typecheck and npm run build must both pass before you
change anything — that proves the toolchain.
4. How it works
Data flow. Views never talk to Home Assistant directly. They use the hooks in src/ha/HaProvider.tsx:
useEntity(id), useEntities([ids]) (subscribe to just those entities), useCallService(),
useCallServiceResponse() (services that return data, e.g. weather.get_forecasts) and useBrowseMedia().
The hooks sit on one interface, HaBackend (src/ha/types.ts), with three implementations: mockBackend.ts
(the demo home), wsBackend.ts (Home Assistant's WebSocket API; HA login or a token) and hassBackend.ts
(inside HA's sidebar). A few things use HA's REST API through plain fetch("/api/…"): history charts
(/api/history/period), calendars (/api/calendars/<id>), the lights-on list (/api/states, /api/template).
In live builds authFetch.ts adds the user's token to those calls. src/main.tsx picks the entry at build time,
so a live build contains no demo code.
Config. Every entity id and every picture position is in src/config/* (see the tree above), plus a few
fixed ids in the files listed in docs/ENTITIES.md (Energy view, Network, Vacuum, music). Change ids there; you
should not need to touch the views.
The demo layer (src/demo/, src/ha/mockBackend.ts, src/lib/mockApi.ts, src/main.demo.tsx,
static/demo/): made-up entity states, a synthetic day (solar curve, battery, house load, where the cats wander),
a sandbox that blocks every network call to Home Assistant, and a fake clock (16:30 by default). world.ts and
bridge.ts let a parent page (or ?t=/?wx=) set the demo's time and weather; when the time jumps, the sky,
sun.sun, solar/battery/grid values, cat rooms, "x minutes ago" stamps and the household lights all follow.
None of this is used in a live build; delete it once live (Step 3).
Language. Every visible string goes through t("English text"). src/i18n/ja.ts maps English → Japanese
({ "Living Room": "リビング", … }), the toggle sits in the sidebar, the choice is kept in localStorage
(sk-lang) and ?lang=ja forces it. To add their language: copy ja.ts to e.g. de.ts and translate the
values, extend type Lang and the t() lookup in i18n/i18n.tsx, add a flag button in
components/shell/LangToggle.tsx (flags in components/common/Flags.tsx), and, if the script needs other fonts,
load them like ja-fonts.ts does. To drop Japanese, keep ja.ts (unused) or remove the toggle.
Theming. All colours are CSS custom properties in src/styles/theme.css (--paper, --ink, --cap
caption yellow, --sky, --c-<view> view colours, --q-* air-quality colours, --line ink width …). Five
plates override them: :root[data-plate="dawn|day|golden|dusk|night"]. src/lc/sky.ts computes the sun's
altitude for src/config/home.ts (latitude, longitude, time zone) every 30 s and sets data-plate on <html>;
CSS transitions (1.2 s) make the page "re-print" from one plate to the next. Fonts: "LC Letter" (Patrick Hand,
the hand-lettered captions) and "LC Title" (Alfa Slab One, numbers and titles) in src/assets/fonts/.
The pictures — how the clear-line art is layered.
- Home drawing (
src/components/home/HomeHero.tsx,hero.css, anchors inconfig/house.ts): four aligned 1920×1086 transparent layers of the same house —ink.webp(outlines only) is drawn first, thenday.webp(the coloured plate) wipes in like a colourist's pass; a tint layer multiplies a golden/pink/violet wash over the house at golden hour/dawn/dusk (masked by the house's own alpha);night.webpfades in with the sun's altitude;litwin.webp(warm glass) is clipped to each window rectangle inLIT_WINDOWSand shown when that window's light entity is on and it is dark. Sky colour, stars, clouds, snow and fog are CSS/SVG on top. Rain, pouring rain and storms arecomponents/home/HeroRain.tsx: an inked storm-cloud deck (SVG), and one Canvas2D layer with three depths of drops (the far ones hidden behind the house using the plate's alpha), splash crowns on roofs and paving and rings on the pool (found from the plate's own colours: turquoise water, dark slate/blue roofs, light paving near the bottom), wet sheen, warm drops in front of lit windows at night, and for storms a forked bolt behind the house, a flash that briefly shows the day colours at night, and blown leaves. The house is tinted darker by weather (hero.css,.wx-rain/.wx-pour/.wx-storm).HERO_STAGEplaces the drawing,SKY_TRACKthe sun's path,ENERGY_TAGSthe three call-outs (solar, battery, house) andCAT_PERCHwhere each pet pops up for each room. All positions are fractions of the picture. - Room cards (
components/rooms/RoomCard.tsx,views/rooms.css):assets/lc/rooms/<key>-i.webp(ink on transparency) is always visible — inverted into cream lines at night — and<key>-c.webp(the coloured room, 1000×672) is revealed by a growing circle from the light switch when the room's light is on. - Curtains & Sheers (
views/CurtainsSheersView.tsx,components/curtains3d/engine.ts): a three.js scene of one window; the view outside isassets/lc2/curtains/<key>_day|_night|_grey.webp(config/plates.tspicks night when the sun is down, grey for cloudy/rain/fog/snow); curtains, sheers, roller or venetian blinds are generated geometry that animates open/closed; rain falls on the glass in rainy weather. - Garden (
views/GardenView.tsx):assets/lc2/garden/day.webp/night.webp(2200×1079, top-down plan) with a numbered lamp marker for each light atGARDEN_LIGHTS[].at(fractions); a lit lamp glows. - Pets (
lc/cats.ts): one whole-body cut-out per pet (assets/lc2/cats/<id>.webp, ~360×560, transparent). - Small drawings (robot vacuum, icons, network gear, litter boxes) are SVG/PNG and generic — keep them.
5. Step 1 — Inventory their Home Assistant
Get the full list of entities with their state and attributes. Either ask the person to open Developer Tools → States in Home Assistant and export/copy the table, or (better) have them create a long-lived access token (their profile → Security → Long-lived access tokens) and run, on their network:
curl -s -H "Authorization: Bearer $HA_TOKEN" http://homeassistant.local:8123/api/states \
  | jq -r '.[] | [.entity_id, .state, (.attributes.friendly_name // ""), (.attributes.device_class // ""),
               (.attributes.unit_of_measurement // "")] | @tsv' > ha-entities.tsv
Keep the token out of the project files (it goes in .env.live only for mode C, which is git-ignored). Group what
you find by what this dashboard needs:
| Needed for | Domains |
|---|---|
| Rooms, lights-on, garden | light, switch (garden/outdoor lights may be either) |
| A/C list, room A/C | climate |
| Curtains & Sheers, curtain indicators | cover (or the script + indicator-switch pattern the demo uses) |
| Air table, top strip | sensor with device_class temperature, humidity, aqi / pm25, carbon_dioxide |
| Home sky, weather, radar | weather.* (any integration with hourly forecasts, e.g. the default Met.no one), sun.sun |
| Calendar | calendar.* |
| Energy | power sensors (kW or W) for grid, solar, house, battery; battery %; energy (kWh) totals |
| Media bar, music | media_player.* |
| Vacuum | vacuum.* (+ optional select clean mode, sensor state/error, button identify) |
| Locks | lock.* |
| Animals | per-pet room sensors (Bluetooth tags / room presence), litter-box sensors, camera snapshots |
| Network | per-device CPU/memory/clients/status sensors from their router/switch/access-point integration |
Match by area, name and device class; ask the person when two candidates fit. Write the mapping down (a simple table "demo id → their id") before editing — it doubles as the checklist for Step 6.
6. Step 2 — Map entities
Edit the files in the first column; docs/ENTITIES.md lists every single id per file. "Hide" instructions are
exact: the app copes with missing entities (shows "—"), but removing the card is cleaner.
| Config (file → key) | What it is | Domain | State / attributes used | Services called | Example (demo) id | If they don't have it |
|---|---|---|---|---|---|---|
home.ts → HOME | home location + clock | — | lat, lon, utcOffset ("device" in live builds) | — | 35.6762, 139.6503 | always set lat/lon (sun times + radar) |
entities.ts → SHELL.media | speaker in the media bar | media_player | state, media_title/artist, entity_picture, media_position(+_updated_at), media_duration, volume_level, shuffle, group_members | media_play_pause, media_next/previous_track, media_seek, volume_set, shuffle_set, join, unjoin, play_media | media_player.sk_living_speaker | remove <MediaBar /> from components/shell/AppShell.tsx |
entities.ts → SHELL.vacuumState | robot status in the sidebar | sensor (or the vacuum itself) | state (docked/cleaning/returning/charging/error…) | — (tap opens Vacuum view) | sensor.sk_maru_state | point it at vacuum.*; or remove the vacuum button in Sidebar.tsx |
entities.ts → SHELL.lock | the lock button in the sidebar | lock | locked/unlocked | lock.lock / lock.unlock | lock.sk_kitchen_door | remove the lock button in Sidebar.tsx |
entities.ts → TOPSTRIP | top strip: AQI out/in, lights on, humidity ×3, house power | sensor | numeric state | — | sensor.sk_outside_aqi, sensor.sk_lights_on, sensor.sk_house_power | create the helpers below, or delete the <span> in TopStrip.tsx |
entities.ts → CLIMATE[] (15) | A/C list on Home (name, floor, pin top/bottom) | climate | state, current_temperature, temperature, hvac_action | climate.set_hvac_mode (cool/off), climate.set_temperature | climate.sk_ac_living | list only theirs; empty list hides the panel content |
entities.ts → AREAS[] (10) | air table: temp / humidity / AQI / CO₂ per area | sensor | numeric state (+ history for sparklines) | — | sensor.sk_master_temperature | drop rows; co2 is optional per row |
entities.ts → CALENDARS[] | agenda on Home (id + colour) | calendar | REST /api/calendars/<id> events | — | calendar.sk_family | list theirs; empty list = empty agenda |
entities.ts → WEATHER | condition, temperature, wind, hourly forecast | weather | state, temperature, humidity, wind_speed, wind_bearing | weather.get_forecasts (hourly) | weather.sk_tokyo | required — use HA's default weather entity |
rooms.ts → ROOMS[] (18) | room cards: light, climate, sheer, blackout, temp, humidity, lock, featureLight | light, climate, cover/switch, sensor, lock | light on/brightness; cover open/closed (or switch on = open); lock state | light.toggle, light.turn_on (brightness_pct), lock services | light.sk_1f_living | set any field to null; delete a room object to drop the card; floor: "1st" | "2nd" picks the tab |
rooms.ts → ROOM_AC | A/C control on a room card | climate (+ optional input_number + script) | target temperature, on/off | with climate only: climate.turn_on/turn_off, climate.set_temperature (±target_temp_step); with helper+script: input_number.increment/decrement, script.turn_on | { climate: "climate.sk_ac_master1" } | use { climate: "climate.x" } per room; delete the room key to hide |
curtains3d.ts → ROOMS3D[] (17) | Curtains & Sheers rooms: key (picks the window picture), name, floor, cover look (curtains/roller/venetian), outdoor (shows weather), run time curtainS/sheerS, types[] | cover (recommended) | cover state open/opening/closing/closed | cover.toggle | { kind: "cover", label: "Curtains", cover: "cover.x" } | delete rooms; set types per room (label: Curtains, Sheers or Blinds); no covers at all → remove the curtains line in app/views.tsx |
garden.ts → GARDEN_LIGHTS[] (20) | outdoor lights: id, name, at [x,y] on the plan, kind | light or switch | on/off | homeassistant.turn_on/turn_off (one or all) | switch.sk_garden_pavilion | list theirs, re-measure at on their plan (Step 4) |
house.ts → LIT_WINDOWS[] | which light lights which window on the house drawing | light | on/off | — | light.sk_1f_stairs | one entry per window you redraw (rect = fractions) |
animals.ts → CATS[], ROOM_RATIO[] | pets (id, name) and the room keys their room sensors report (label, colour) | sensor | sensor.<id>_room = a room key or away; sensor.<id>_room_ratio_<7d|today>_<room> = % | — | sensor.mochi_room | CATS = [] and remove the Animals line in app/views.tsx; the Home drawing then shows no pets |
animals.ts → SPOTTINGS[] | two "spotted on camera" cards: picture path, camera name, time | input_text, input_datetime | text; datetime | — | input_text.sk_spotting_1_camera | delete the entries (cards disappear) |
animals.ts → LITTER_BOXES[] | litter boxes: state + occupied | sensor | state (clear/occupied/cleaning…) | — | sensor.sk_litter_cat_room_state | delete entries |
views/EnergyView.tsx → E | power now (kW), battery %, kWh today/week/month (grid import, solar, battery out), savings | sensor | numeric state (+ history today) | — | sensor.sk_solar_power | create helpers below; or remove the Energy line in app/views.tsx and ENERGY_TAGS use in the hero |
components/home/HomeHero.tsx | solar/battery/house call-outs, sun.sun | sensor, sun | numeric | — | sensor.sk_battery_level | same ids as the Energy view |
components/vacuum/vacuumModel.ts | robot vacuum: VAC, MODE, OP_STATE, OP_ERROR, IDENTIFY; config/vacuumPlan.ts = plan drawing | vacuum, select, sensor, button | state, battery_level, fan_speed, supported features | vacuum.start/pause/stop/return_to_base/locate, select.select_option, button.press | vacuum.sk_maru | remove the Vacuum line in app/views.tsx and the sidebar button |
components/music/useMusicData.ts → speakers, lib/music.ts → SP_PLAYER | speakers for grouping + the music library account | media_player | as media bar | media_player.*; library/search uses response services of a music-service integration (musicplus.* in the code) | media_player.sk_family_speaker | list theirs; without a library integration, adapt useMusicData.ts to useBrowseMedia() or hide the library tabs |
lib/networkData.ts (+ networkLive.ts) | Network view: WAN latency, gateway/switch/AP/camera/server CPU, memory, clients, status, rack power, temperatures | sensor, binary_sensor | numeric/state | — | sensor.sk_net_wan1_latency | the view falls back to its built-in layout; simplest: remove the Network line in app/views.tsx |
Helpers you may need (create them in Settings → Devices & services → Helpers → Create helper — Template, Utility Meter and History stats helpers all exist there; the YAML below is the same thing in configuration form):
# Lights on (top strip). The app also builds its own list from /api/states, this is just the number.
template:
  - sensor:
      - name: "Lights on"
        unique_id: dashboard_lights_on
        state: "{{ states.light | selectattr('state', 'eq', 'on') | list | count }}"
      # House power in kW from grid + solar + battery (grid + = importing, battery + = discharging).
      # Divide by 1000 if your sensors are in W. The dashboard expects kW for every power sensor.
      - name: "House power"
        unique_id: dashboard_house_power
        unit_of_measurement: "kW"
        device_class: power
        state_class: measurement
        state: >
          {{ (states('sensor.YOUR_GRID_POWER_KW') | float(0) + states('sensor.YOUR_SOLAR_POWER_KW') | float(0)
              + states('sensor.YOUR_BATTERY_POWER_KW') | float(0)) | round(2) }}
      # Savings today = solar used in the house × your tariff + exported × feed-in (currency of your choice)
      - name: "Solar savings today"
        unique_id: dashboard_savings_today
        state: >
          {% set solar = states('sensor.solar_energy_daily') | float(0) %}
          {% set export = states('sensor.YOUR_EXPORT_ENERGY_DAILY') | float(0) %}
          {{ ((solar - export) * 0.30 + export * 0.08) | round(0) }}

# kWh today / this week / this month for the Energy totals (source = an ever-increasing kWh sensor)
utility_meter:
  grid_import_daily:   { source: sensor.YOUR_GRID_IMPORT_KWH,   cycle: daily }
  grid_import_weekly:  { source: sensor.YOUR_GRID_IMPORT_KWH,   cycle: weekly }
  grid_import_monthly: { source: sensor.YOUR_GRID_IMPORT_KWH,   cycle: monthly }
  solar_energy_daily:  { source: sensor.YOUR_SOLAR_KWH,         cycle: daily }
# … same for weekly/monthly, and for battery discharge (battery_export_*)# Pets: share of time per room (one History stats helper per pet × room × period; ratio = %)
sensor:
- platform: history_stats
name: "mochi room ratio today kitchen_1" # entity becomes sensor.mochi_room_ratio_today_kitchen_1
entity_id: sensor.mochi_room
state: "kitchen_1"
type: ratio
start: "{{ today_at() }}" # 7-day version: start: "{{ now() - timedelta(days=7) }}", name … ratio 7d …
end: "{{ now() }}"Spotting cards read /local/snapshots/animals/spotting-1.jpg relative to where the app is hosted — in mode A
that is the file <config>/www/dashboard/local/snapshots/animals/spotting-1.jpg. An automation that runs
camera.snapshot to that path (add /config/www to homeassistant: allowlist_external_dirs) and sets the
input_text (camera name) and input_datetime (time) keeps them fresh.
7. Step 3 — Go live
The go-live kit is already wired in (src/main.tsx, main.live.tsx, main.panel.tsx, src/ha/wsBackend.ts,
hassBackend.ts, authFetch.ts, vite.config.ts, .env.example, panel-loader.js). cp .env.example .env.live, then pick a mode:
- A — inside Home Assistant (recommended). Keep
VITE_HA_MODE=liveandBASE=/local/dashboard/, runnpm run build:live, copy everything indist/to<config>/www/dashboard/(Samba, File editor or Studio Code Server add-on, orscp), openhttp(s)://<home-assistant>:8123/local/dashboard/index.htmlon the tablet. Home Assistant's own login page appears once; the browser keeps the session. Files inwww/are public to anyone who can reach Home Assistant, so a build never contains a token (the config refuses to embed one). - B — a page in Home Assistant's sidebar. Do A, copy
panel-loader.jsinto the same folder, add thepanel_custom:block from the top ofpanel-loader.jstoconfiguration.yaml, restart. Uses HA's session. - C — development against their Home Assistant. Set
VITE_HA_TARGET(e.g.http://homeassistant.local:8123) andVITE_HA_TOKENin.env.live, runnpm run dev:live. The dev server proxies/api(REST + WebSocket) and adds the token — keep it on their own network.
Nothing to swap: the views use the same hooks in every mode, and a live build already leaves the demo out
(src/demo/, the mock backend and the demo bridge are never imported). Once they're happy, delete the demo for
good: src/demo/, src/ha/mockBackend.ts, src/lib/mockApi.ts, src/config/curtains.ts,
src/main.demo.tsx, static/demo/, and the else { import("./main.demo") } branch in src/main.tsx
(then npm run typecheck). In a live build src/config/home.ts uses the tablet's own time zone, so the sky
follows real time — set lat/lon to their home.
8. Step 4 — Pictures
Every picture that shows the home must be replaced with theirs; generic UI art is kept. Sizes are what the app is laid out for — keep the aspect ratio exactly, and keep transparent backgrounds transparent.
| Path | Size | Role / how it's used | Keep / replace |
|---|---|---|---|
src/assets/lc2/house/day.webp | 1920×1086, transparent | the house plate on Home (coloured) | replace |
src/assets/lc2/house/ink.webp | 1920×1086, transparent | outlines only, drawn under the colour wipe | replace (made by lc_art.py ink) |
src/assets/lc2/house/night.webp | 1920×1086, transparent | night grade of the plate | replace (lc_art.py grade --mode night) |
src/assets/lc2/house/litwin.webp | 1920×1086, transparent | warm glass for lit windows (clipped per window) | replace (lc_art.py litwin) |
src/assets/lc2/garden/day.webp, night.webp | 2200×1079, transparent | Garden view top-down plan | replace (night via grade) |
src/assets/lc/rooms/<key>-c.webp (18) | 1000×672 | coloured room (revealed when the light is on); also the room chips on Curtains | replace |
src/assets/lc/rooms/<key>-i.webp (18) | 1000×672, transparent | the room's ink layer | replace (ink) |
src/assets/lc2/curtains/<key>_day.webp (17) | 1200×896 (4:3) · 896×1200 (3:4) · 1264×848 (3:2) | view through each window (Curtains view) | replace |
src/assets/lc2/curtains/<key>_night.webp, _grey.webp | same as day | night / overcast versions (grey is optional; day is used if missing) | replace (grade) |
src/assets/lc2/cats/<id>.webp (6) | ~360×560, transparent | whole-body pets (Home pop-ups, Animals) | replace with their pets, or drop with CATS = [] |
static/local/snapshots/animals/spotting-1.jpg, -2.jpg | 1273×720 | "spotted on camera" cards | replace (live: written by an automation) |
static/local/pets/<id>.webp (6) | 512×512 | fallback pet portraits (not shown while the cut-outs exist) | replace or delete |
static/local/rooms/<key>.webp (18) | 480×720 | ROOMS[].photo — not displayed by this design | delete or replace |
static/local/icon.png | 512×512 | home-screen / browser icon | replace (optional) |
static/demo/camera/*.jpg, static/demo/music/*.jpg | 1273×720 · 320×320 | demo camera stills and album covers | demo only — delete when live |
static/local/network/assets/gear/*.png (11) | ~280×250 | drawings of generic network gear | keep |
static/local/*.svg (litter boxes, dining feature light, lights on/off) | small | UI drawings | keep |
src/lc/Maru.tsx, src/lc/icons.tsx | SVG in code | the robot vacuum and icons | keep |
src/components/curtains3d/engine.ts | code | 3D curtains/blinds are generated — no model files | keep |
fonts (src/assets/fonts/, static/fonts/) | — | lettering | keep (OFL) |
The look to aim for ("ligne claire", the clear line of classic Franco-Belgian comic albums): one constant,
thin black outline everywhere; flat colour fills, no gradients, no hatching, no texture; trees as rounded
cloud-like masses; a few flat shadow shapes; calm, readable compositions with no text. docs/prompts/00-style.txt
is the style block to paste into every prompt; the other files are complete templates (house, garden, nine-room
sheets, window views, pets). Their own photos as references (image-to-image) are exactly right — it's their home.
Recipe (any image source).
- House: a photo of the house from the street or above at a three-quarter angle (a drone shot, a 3D map view,
or a render of a free 3D model) → prompt
10-house.txt→ transparent PNG ≥ 1920 wide. Thenpython3 tools/lc_art.py fit house.png day.webp --size 1920x1086, then make every other layer from that fitted plate so they align:ink day.webp ink.webp,grade day.webp night.webp --mode night. Opentools/measure.html, loadday.webp, drag a rectangle over each window (→LIT_WINDOWSrects + light ids; save the rects as JSON and runlc_art.py litwin day.webp litwin.webp --rects windows.json --hue 165-225if the glass is blue), click a perch per room for the pets (CAT_PERCH), anchors for the three energy call-outs (ENERGY_TAGS). - Garden: prompt
20-garden.txtwith a map/satellite view →fit garden.png day.webp --size 2200x1079→grade day.webp night.webp --mode night→ measure one point per outdoor light →GARDEN_LIGHTS[].at. - Rooms: nine at a time for a consistent style —
lc_art.py collage rooms_ref.png --grid 3x3 --size 1000x672 r1.jpg … r9.jpg→ prompt30-rooms-sheet.txt→lc_art.py slice sheet.png out/ --grid 3x3 --names tatami,living,… --size 1000x672→ per roomfit out/k.png k-c.webp --size 1000x672andink out/k.png k-i.webp. Keys are insrc/lc/roomArt.ts(KEYmaps room names to file keys — add theirs there). - Window views: one sheet per shape (
40-window-views.txt), slice + fit, thengrade … --mode nightand--mode grey. File keys =ROOMS3D[].key. - Pets:
50-pets.txtwith one photo per pet → slice →lc_art.py cutout out/<id>.png <id>.webp --height 560→ add tosrc/lc/cats.tsandCATS.lc_art.pyneeds Python 3.9+ and Pillow (pip install pillow);measure.htmlopens in any browser, offline.
Paid image services or free alternatives. The demo's pictures were drawn with a paid image model (GPT Image class) from made-up references. Free routes, best first for this look:
- Image-to-image chat models (free tiers) — ChatGPT's free image tier and Google Gemini both follow the long style block well and take a reference photo; best for the house, rooms and pets. Microsoft Designer / Bing Image Creator (free), Ideogram (free tier, very good at flat illustration), Leonardo (daily free tokens, image guidance + style reference), Adobe Firefly (monthly free credits) and Krea (free tier) also work; ask for "flat vector comic illustration, uniform black outline".
- Local, free and unlimited — FLUX.1 [schnell] or SDXL in ComfyUI or Forge (or Draw Things on a Mac/iPad): combine a ControlNet (lineart or canny) made from their photo — keeps the exact layout of their rooms — with a "clear line comic" LoRA and the style block; fix the seed and settings for the whole series.
- No AI — trace their photos: put the photo on a layer, draw outlines with one fixed stroke width in Inkscape (free), Krita (free) or Procreate, fill flat colours from a 10–12 colour palette; this style is one of the easiest to trace and gives the most faithful result. For the house plate, a free Sweet Home 3D or Blender model rendered with flat shading and Blender's Freestyle outlines is an excellent base. An illustrator can work from the same templates.
- Keep a series consistent: generate rooms and window views as 3×3 sheets in one go; reuse the same style
block and palette words; give the finished house plate as a second reference for everything else; downscale all
plates to their final size before
inkso line widths match; use the same--kfor everyinkrun.
9. Step 5 — Build & run
npm run build:live → dist/ (static files; ~11 MB, mostly pictures). Host it in Home Assistant's www/
(mode A/B) — nothing else to run. The layout is designed at 1376×1032 CSS px (13-inch tablets in landscape);
below 1300×930 it scales the whole page down uniformly (components/shell/AppShell.tsx, fit), so 10–11-inch
tablets (≈1180×820) and 1280×800 Android tablets work too; portrait is not supported. Kiosk tips: Android → Fully
Kiosk Browser (screen on, motion wake, start URL = the mode A address); iPad → open the URL in Safari, Share → Add
to Home Screen (it runs full-screen, the page has the web-app meta tags), then Settings → Accessibility → Guided
Access to lock it, and Display → Auto-Lock → Never (keep it charging). Give the tablet a fixed time zone equal to
the home's.
10. Step 6 — Verify
Tick each item on the real tablet (or a browser at 1376×1032) against their Home Assistant:
-
npm run typecheck,npm run build,npm run build:liveall pass; the browser console has no errors. - Home: clock and date right; sun/moon on the track at the right time; sunrise/sunset ticks match their local times; plate (day/golden/dusk/night) matches the sky outside; weather label, temperature and wind are theirs; lit windows follow their lights after dark; solar/battery/house call-outs show their numbers.
- A/C list: every unit listed, on/off and set-temperature work (check
hvac_mode— see Gotchas). - Air table, top strip, calendar (next events from their calendars), radar centred on their home.
- Rooms: each card's light toggles and dims the right light; A/C, curtain indicators, locks correct.
- Curtains: every room's buttons move the right cover; the view outside shows night/grey correctly.
- Garden: each numbered lamp toggles the right light; "all on/off" works; the plan is theirs.
- Energy: today's chart draws up to now; totals and savings match Home Assistant's numbers.
- Animals / Vacuum / Network / music: either mapped and working, or removed from
app/views.tsx. - 日本語 (or their language) shows no untranslated strings they care about.
- On the tablet: smooth scrolling, the Curtains view opens in under ~2 s, memory stays stable after an hour (Safari: Settings → Safari → Advanced → Web Inspector from a Mac if anything misbehaves).
11. Make it theirs
- Name:
index.html(<title>,apple-mobile-web-app-title), the sidebar title (components/shell/Sidebar.tsx, "SAKURA HOME"), the radar label (components/home/RadarMap.tsx), the music player title (components/music/MusicPlayer.tsx), the hero's alt text (HomeHero.tsx),static/local/icon.png. - Place:
src/config/home.ts(lat/lon). The radar draws a river/bay outline for the demo city (src/lc/tokyoGeo.ts, used inRadarMap.tsx): remove theSEA/RIVERSpaths or replace them with their own. - Rooms:
config/rooms.ts(cards, floors),lc/roomArt.ts(picture keys),config/curtains3d.ts,config/house.ts(windows and perches), the floor tabs' labels inviews/RoomsView.tsx. - Colours & fonts:
styles/theme.csstokens (each plate overrides a few),styles/fonts.css. Keep the ink near-black and fills flat — the whole look depends on it. - Language: see "4. How it works" → Language (
src/i18n). - Views: remove a line in
src/app/views.tsxto remove a view (and its sidebar button follows). - Lettering: captions are written as comic captions ("Meanwhile, inside…", "Later that night…") in
HomeHero.tsxand the views; rewrite them in their own voice.
12. Gotchas
- Time zones. The demo reads every visitor's clock as the demo city's local time (
HOME.utcOffset: 9) so the sky always matches the clock it shows; live builds use the device's zone ("device"). If the tablet's zone is wrong, the sky is wrong — set it. - Weather condition names are Home Assistant's (
sunny,clear-night,partlycloudy,cloudy,fog,rainy,pouring,lightning-rainy,snowy,windy…).sunnyafter dark is shown as a clear night. - A/C modes. The Home A/C list turns units on with
hvac_mode: "cool"(components/home/ClimateList.tsx); useheat_cool,autoorheatif their units don't docool(see each entity'shvac_modes). - Big installations. Views subscribe only to their own entities — keep it that way. The lights-on list
re-reads
/api/statesevery 30 s (lib/useRealLights.ts); with thousands of entities, switch it touseEntities()over their light ids or the "Lights on" template sensor. - iPad/WebKit. The Curtains view uses WebGL (three.js); older iPads with little memory can reload the page if
the view is left open for days — reload nightly (Fully Kiosk / a Home Assistant automation) if that happens.
Masks and blend modes use
-webkit-prefixes already; test in Safari, not only Chrome. - Units. Power sensors are read as kW; temperatures as °C (change labels in the views for °F); the Energy view
shows ¥ for savings in the demo — change the currency in
views/EnergyView.tsx. - Motion.
prefers-reduced-motionturns animations and transitions into instant changes (styles/app.css). - Rain on older tablets.
HeroRain.tsxcaps the drops (≈225–480 by intensity and panel size, a third are dropped automatically if frames stay slow), the canvas resolution (≈2.4 Mpx) and the frame rate (~50 fps), pauses while the page is hidden and draws one still frame (no flashes) for reduced motion; its own script time is a few ms per frame. If splashes land in odd places on your own plate, adjust the colour rules inreadSurfaces()to your palette. - Pictures: the hero assumes the house plate is 1920×1086 and that its transparent area is sky; anything you leave opaque at the top will hide the sun track.
- Japanese fonts are fetched from Google Fonts only when 日本語 is switched on; everything else is local.
- Radar tiles come from RainViewer (free public API) on a CARTO basemap (© OpenStreetMap contributors, © CARTO); check their terms if the dashboard is used commercially.
13. Licences
- Code: MIT — see
LICENSE("Copyright (c) 2026 dashboards.casa"). - Fonts: SIL Open Font License 1.1 —
src/assets/fonts/OFL.txt(Patrick Hand, Alfa Slab One) andstatic/fonts/OFL.txt(Oswald, Archivo, Manrope). Japanese fonts (Zen Maru Gothic) load from Google Fonts (OFL). - The made-up home's pictures (house, garden, rooms, window views, pets, snapshots, covers): made for this demo; free to use as examples and as references for their own pictures.
- npm packages: their own licences (React, React DOM, Vite, three.js — MIT; @mdi/js icons and home-assistant-js-websocket — Apache-2.0; TypeScript — Apache-2.0).