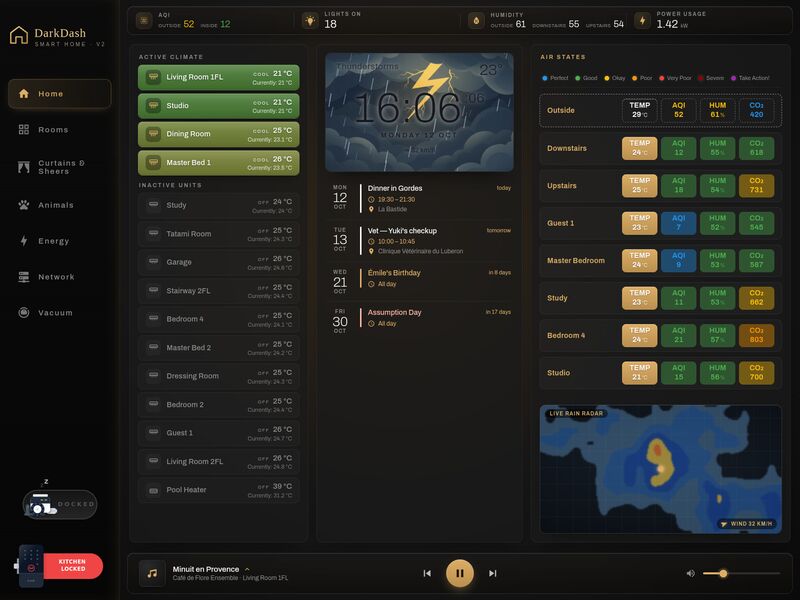
You are an AI coding agent (Claude Code, Codex, Cursor …). A person handed you this package because they want the DarkDash wall-tablet dashboard running on their Home Assistant. This guide is written to you. It is complete: you should not need to ask the authors anything. The person is not necessarily a developer — explain what you do in plain words, ask them only what you cannot read from their Home Assistant, and never paste their access token into chat logs, files that get published, or a build.
Everything in the package — the home, its rooms, pets, people, entity ids, numbers and pictures — is made up. Nothing in it describes a real house. Replace it with theirs.
1. What you're building
DarkDash is a dark, warm-gold "glass" dashboard for a wall-mounted tablet in landscape: a left rail with seven views (Home · Rooms · Curtains & Sheers · Animals · Energy · Network · Vacuum), a top strip (air quality, lights on, humidity, power use) and a bottom media bar. Home shows every A/C unit, an animated weather card with the clock, the calendar, air quality per area and a live rain radar. Rooms shows a photo card per room (colour when its lights are on, grey when off) with dimmer, curtain status and A/C controls. Curtains & Sheers is a real-time 3D window (three.js): simulated curtains and sheers open and close like the motors do, and the view outside follows the weather and the time of day (rain on the glass, lightning, fog, dusk, night). Animals tracks pets room by room; Energy draws today's solar / grid / battery day; the Network view is a printed-sheet picture of the home network; Vacuum drives a robot vacuum.
DarkDash, the made-up demo home
What the person needs:
- Home Assistant 2024.1 or newer (it uses the WebSocket
subscribe_entitiesAPI and services that return data; both exist since 2023.x). No custom cards, no HACS needed for the dashboard itself. - A wall tablet in landscape (designed at 1560 × 1170 CSS px, a 4:3 iPad-class screen; see Step 5) or any browser. A computer with Node.js 18+ to build it (the authors built with Node 22).
- Nothing else. Pictures of their own home are optional (the demo pictures work as placeholders).
Time: run the demo 10 min · inventory + entity mapping 30–90 min (depends on the house) · go live 20 min · new pictures 0 min (keep the demo's) to an afternoon (generate or photograph their own).
2. What's in this package
HANDOFF.md            this guide (also published at dashboards.casa/handoff/darkdash/)
README.md             three lines: what it is, read this file, npm install && npm run dev
LICENSE               MIT for the code (fonts and npm packages keep their own licences)
package.json          exact versions the demo was built with; scripts dev / dev:live / build / build:live / typecheck
vite.config.ts        dev server (+ the token proxy for mode C) and builds; BASE decides where a build is hosted
tsconfig.json         TypeScript settings (strict)
index.html            page shell (iPad Home-Screen flag, ?embed size pin)
.env.example          copy to .env.live for the live modes (VITE_HA_MODE, VITE_HA_TARGET, VITE_HA_TOKEN, BASE)
panel-loader.js       mode B: the tiny module Home Assistant loads to show the dashboard in its sidebar
.gitignore
live/README.md        the go-live kit's own guide (modes A, B, C in detail)
docs/still.jpg        the demo's poster
tools/fit_image.py    resize + crop any picture to a slot's exact size, metadata stripped (Pillow)
tools/check_plate.py  checks a room's two 3D-window plates (alignment, rain mask, rectangles) (Pillow)
public/               static files, served from the site root (/local/…, /curtains3d/…, /fonts/…)
  curtains3d/         3D window plates: <room>day_hf.jpg + <room>storm_hf.jpg, 1264×848, 9 rooms
  local/rooms/        18 room photos for the Rooms cards, 1264×848
  local/pets/         6 pet portraits, 512×512 WebP
  local/snapshots/animals/  2 "pet spotted" camera stills, 1264×848
  local/weather/      12 cartoon skies (6 conditions × day/night), 1000×558 WebP
  local/network/assets/gear/  11 drawings of network gear (SVG)
  local/*.svg         robot vacuum states, lock, litter box, light toggles, the DarkDash logo
  fonts/              Archivo + Oswald (woff2) with their OFL licence files
  darkdash-icon.png   Home-Screen icon (180×180)
src/
  main.tsx            start-up switch: demo (default) · live (VITE_HA_MODE=live) · sidebar panel (?panel=1)
  main.demo.tsx       demo entry: mock backend + fake REST + the demo clock/weather layer
  main.live.tsx       modes A + C: connects to Home Assistant over WebSocket, then renders the app
  main.panel.tsx      mode B: receives `hass` from Home Assistant's sidebar
  App.tsx             i18n provider + the app shell
  app/views.tsx       the seven views in rail order (delete a line to drop a view)
  config/             ★ every entity id lives here — entities.ts, rooms.ts, curtains3d.ts, animals.ts (+ curtains.ts, demo only)
  ha/                 types.ts (HaBackend), HaProvider.tsx (hooks), wsBackend.ts, hassBackend.ts, authFetch.ts, mockBackend.ts (demo)
  demo/               demo only: scenario.ts (made-up clock, sun, weather, energy…), bridge.ts (time/weather from a parent page)
  lib/                clock, weather helpers, history/calendar hooks, lights-on logic, music search, network sheet, demo data
  components/         shell (rail, top strip, media bar, lights popup), home, rooms, curtains3d engine, animals, energy, music, vacuum
  views/              one file + one stylesheet per view
  i18n/               t("English") layer + fr.ts (second-language strings, empty)
styles/ theme.css (design tokens), fonts.css, app.css3. Run the demo first
Prove the toolchain before touching their house:
npm install
npm run dev          # prints http://localhost:5173/ — open it in a desktop browser
The made-up home runs with no Home Assistant at all: src/ha/mockBackend.ts holds every entity, service calls
change its own states (lights, A/C, curtains, vacuum, lock and music respond), and src/lib/mockApi.ts answers the
app's REST calls (history, calendars, lights list) with made-up data. The only network traffic is the rain radar
(RainViewer's public tiles).
Things to try: every view in the rail; tap a room light; open the curtains on Curtains & Sheers; open the "Lights on"
number in the top strip; tap a cat. Time and weather can be set from the address bar: ?t=21:30 (any HH:MM) and
?wx=snowy (sunny, partlycloudy, cloudy, fog, rainy, pouring, lightning-rainy, snowy, windy) — e.g.
http://localhost:5173/?t=18:40&wx=sunny shows dusk. npm run typecheck should report no errors.
4. How it works
Data flow. Every view talks to Home Assistant through one interface, HaBackend (src/ha/types.ts):
getStates(), subscribe(ids, cb), callService(domain, service, data, target), callServiceResponse(…) (services
that return data) and browseMedia(…). src/ha/HaProvider.tsx wraps it in React hooks — useEntity(id),
useEntities(ids), useCallService(), useCallServiceResponse(), useBrowseMedia() — and views never know which
backend is behind them:
views + components ──read ids from──▶ src/config/*.ts
        │ useEntities([...ids]) / useCallService()
        ▼
   HaProvider (React context)
        │ HaBackend
        ├── mockBackend.ts   demo: a made-up home in memory, no network
        ├── wsBackend.ts     live, modes A + C: WebSocket subscribe_entities (only the ids a view asks for)
        └── hassBackend.ts   live, mode B: the `hass` object Home Assistant hands its sidebar panels

REST side-channel (plain fetch to same-origin /api/…, not through HaBackend):
   /api/history/period/…   energy charts, pet timelines        (src/lib/useHistory.ts, components/animals/CatTimeline.tsx)
   /api/states[/<id>]      "lights on" list, latest pet room   (src/lib/useRealLights.ts, CatTimeline.tsx)
   /api/calendars/<id>     calendar agenda                     (src/lib/useCalendarEvents.ts)
   /api/template           only if you set SWITCH_INTEGRATION  (src/lib/useRealLights.ts)
   demo: answered by src/lib/mockApi.ts · live: src/ha/authFetch.ts adds the user's token (modes A, B),
   the dev server's proxy adds it (mode C)
Each view subscribes only to its own entities and unsubscribes when you leave it, so it stays light on big
installations (thousands of entities). Keep it that way when you add cards: useEntities([...ids]), never "all states".
Demo vs live. src/main.tsx picks the entry at build time: VITE_HA_MODE=live (from .env.live) builds
main.live.tsx / main.panel.tsx; anything else builds main.demo.tsx. A live build contains no demo code.
Config. Every entity id is in src/config/ (plus three small lists named in Step 2: vacuum, energy, speakers).
Adapting the dashboard to a house means editing those files, not the components.
Time. All views read the time through src/lib/clock.ts (now(), useNow(), dataNow()), never
Date.now() directly. Live, that is simply the tablet's clock. The demo layer (src/demo/scenario.ts) can move it —
that is how ?t= and the dashboards.casa time slider work — and keeps history charts ending at 23:00 by default so
the made-up day looks complete. src/demo/bridge.ts is the small postMessage protocol the dashboards.casa page uses
to set time and weather from outside (live builds don't include it).
Weather + sun. src/lib/weather.ts turns the weather entity's condition and sun.sun (above/below horizon,
elevation, rising) into: the weather card's sky (12 pictures: clear, partly, cloudy, fog, rainy, storm × day/night)
with rain / snow / fog / lightning animated on top and a dawn/dusk wash when the sun is within 12° of the horizon; the
3D window's scene (curtainScene()); and the radar's demo echo.
3D window (Curtains & Sheers). src/components/curtains3d/engine.ts puts a photographed plate (the window
wall seen head-on) behind GPU-simulated curtains, sheers, roller or venetian blinds. Per room there are two plates,
<key>day_hf.jpg (clear day) and <key>storm_hf.jpg (same framing, storm). Sixteen looks are made from those two by
colour grades: day, partly cloudy, dusk, overcast, fog, snow, rain, pouring, storm, and night versions of most —
same-plate changes re-grade, plate changes cross-fade (1.6 s; 0.25 s with reduced motion). Rain is clipped to the
glass: the engine builds a mask from the day plate's brightness (dark frame and mullions = no rain) inside the
room's glass rectangle; optional pool and deck rectangles add splashes and ripples. Rectangles are fractions of
the plate, [u0, v0, u1, v1], with v measured from the bottom. Covers animate at the duration you give them
(curtainS, sheerS seconds).
Rooms pictures are plain photos; the card desaturates them when the room's light is off.
i18n. UI text is wrapped in t("English") (src/i18n/i18n.tsx). The app ships English-only; src/i18n/fr.ts
is the (empty) second-language dictionary { "English": "Traduction" }. To add a language: rename/fill that file,
set Lang in i18n.tsx to "en" | "<code>", and call useLang()[1]("<code>") from a button of your own (the rail
has room for a toggle; components/shell/langtoggle.css has its styles). Missing strings fall back to English.
Theme. src/styles/theme.css holds the tokens (--gold #dcae65, backgrounds, glass blur, radii, --font);
each view has its own stylesheet next to it. Fonts are self-hosted (public/fonts), so no request goes to a font CDN.
5. Step 1 — Inventory their Home Assistant
Get a full list of their entities first. Two ways:
- REST (needs a long-lived token: Home Assistant → their profile → Security → Long-lived access tokens):shKeep
curl -s -H "Authorization: Bearer $HA_TOKEN" http://homeassistant.local:8123/api/states \ | python3 -c 'import json,sys; [print(e["entity_id"], "|", e["state"], "|", e["attributes"].get("friendly_name","")) for e in json.load(sys.stdin)]' > ha-entities.txtha-entities.txtand the token out of the project folder and out of any commit. - No token: Developer Tools → States in Home Assistant; filter by domain and copy what you need.
Also check: sun.sun exists (it does unless they removed default_config), which weather.* entity they trust, and
whether their calendars are calendar.* entities.
Domains this dashboard uses: climate (A/C), light, switch (optional), cover or script + input_boolean
(curtains), sensor (temperature, humidity, AQI, CO₂, energy, pets, litter boxes, vacuum), weather, sun,
calendar, media_player, lock, vacuum + select + button (robot vacuum), input_number / input_text /
input_datetime (helpers). Match by friendly name and area: list their areas (Settings → Areas) and walk the
dashboard room by room with the person. Write the mapping down as a table (dashboard key → their entity id) before
editing anything.
6. Step 2 — Map entities
Edit the ids in the files below. Every id in the package is a made-up example. Rows marked (n) are lists — keep as many entries as they have, delete the rest. "Missing?" says what to do when they don't have it. Numeric values that are missing render as "—"; nothing crashes.
src/config/entities.ts
| Key | What it is | Domain | Reads | Services | Example id | Missing? |
|---|---|---|---|---|---|---|
SHELL.media | speaker shown in the bottom media bar | media_player | state, media_title, media_artist, entity_picture, volume_level | media_play_pause, media_previous_track, media_next_track, volume_set | media_player.speaker_1 | remove <MediaBar /> from components/shell/AppShell.tsx |
SHELL.vacuum, SHELL.vacuumState | rail vacuum icon | vacuum, sensor | state | — | vacuum.robovac, sensor.robovac_operational_state | see Vacuum below |
SHELL.lock | rail door-lock button | lock | state (locked) | lock.lock, lock.unlock | lock.kitchen_lock | delete the lock <button> in components/shell/Sidebar.tsx |
TOPSTRIP.aqiOutside, .aqiInside | top strip AQI | sensor | numeric state | — | sensor.outdoor_aqi, sensor.aqi_1 | any AQI/PM sensor; else the value shows "—" |
TOPSTRIP.humOutside, .humDownstairs, .humUpstairs | top strip humidity | sensor | % | — | sensor.outdoor_humidity, sensor.humidity_11, sensor.air_monitor_humidity_2 | "—" |
TOPSTRIP.power | top strip power use | sensor | kW | — | sensor.pv_load_power | template sensor below |
TOPSTRIP.lightsOn | subscribed, not shown (the number counts every light.* that is on) | sensor | — | — | sensor.lights_on_1 | leave as is |
CLIMATE (15) | Home: every A/C (floor 1/2 groups the idle list; pin "top"/"bottom") | climate | state (hvac mode, "off" = idle), current_temperature, temperature | climate.set_hvac_mode cool / off on tap | climate.ac_1 … climate.ac_14, climate.pool_heat_1 | delete entries; heat pumps: change "cool" in components/home/ClimateList.tsx |
AREAS (8) | Home: chips per area | sensor ×3–4 | temp °C, hum %, aqi, optional co2 ppm | — | Outside: sensor.outdoor_temperature, sensor.outdoor_humidity, sensor.outdoor_aqi · Downstairs: sensor.temperature_6, sensor.humidity_11, sensor.aqi_1, sensor.co2_6 · Upstairs: sensor.air_monitor_temperature_2, …_humidity_2, sensor.aqi_upstairs, sensor.air_monitor_carbon_dioxide_2 · Guest 1 / Master Bedroom / Study / Bedroom 4 / Studio: sensor.temperature_N, sensor.humidity_N, sensor.aqi_<area>, sensor.co2_N | drop co2 (optional) or the whole area |
CALENDARS (5) | Home agenda; color per calendar | calendar | /api/calendars/<id> events | — | calendar.family, calendar.france_holidays, calendar.family_1…_3 | delete entries |
WEATHER | weather card, radar wind arrow, 3D window | weather | state (condition), temperature, wind_speed, wind_speed_unit, wind_bearing | — | weather.home_1 | required for the weather card (any weather integration) |
HOME_LOCATION | radar centre { lat, lon } | — | — | — | Provence | put their town (not their exact address) |
sun.sun (used directly) | day/night, dusk | sun | state, elevation, rising | — | sun.sun | without it a 06:00–19:00 day is assumed |
src/config/rooms.ts
| Key | What it is | Domain | Reads | Services | Example id | Missing? |
|---|---|---|---|---|---|---|
ROOMS[].name, .floor, .photo (18) | one card per room ("1st"/"2nd" floor tab) | — | — | — | "LIVING ROOM", /local/rooms/living_room.jpeg | delete rooms |
ROOMS[].light | the room's light (or light group) | light | state, brightness | light.toggle, light.turn_on brightness_pct (dimmer) | light.room_lights_11, light.tatami_light_group | null hides the dimmer |
ROOMS[].featureLight | optional second light, drawn as an SVG toggle | light | state | light.toggle | light.room_lights_3 | omit |
ROOMS[].climate | the room's A/C | climate | state, current_temperature | via ROOM_AC | climate.ac_8 | null |
ROOMS[].humidity | humidity (or temperature) shown on the card | sensor | state | — | sensor.humidity_6 | null |
ROOMS[].sheer, .blackout | curtain status line ("SHEERS OPEN" …) | switch, input_boolean, binary_sensor or cover | on / open / opening = open | — | switch.keypad_led_11, switch.keypad_led_10 | null hides the line |
ROOM_AC["ROOM NAME"] (per room, 1–2 units) | A/C toggle + target ±1° on the card | input_number (target) + script (toggle) (+ optional own climate, color) | helper state | script.turn_on; input_number.increment / decrement | input_number.target_temp_5 + script.ac_toggle_5 | omit the room key (no A/C row) — or create the helper + script below |
KITCHEN_LOCK | lock badge on the KITCHEN card | lock | state | — | lock.kitchen_lock | any id / leave |
FLOOR_VIEW | not used by the views | — | — | — | input_select.floor_view | ignore |
src/config/curtains3d.ts — the 3D window (and src/config/curtains.ts, demo only)
ROOMS3D (9): key (plate file prefix), name, floor, cover (curtains | roller | venetian), baseHex
(cloth colour), curtainS / sheerS (seconds a run takes), glass, pool, deck, deckFar, and types — one
entry per button. Three kinds of entry:
| Kind | Use when | Fields | Reads | Services | Example |
|---|---|---|---|---|---|
{ kind: "cover", label, entity } | they have cover.* entities (most homes) | entity | state open/opening = open | cover.toggle | { kind: "cover", label: "Curtains", entity: "cover.living_room_curtains" } |
{ kind: "scripted", label, open, dir, script } | motors driven by a script with an "is open" indicator (the demo's model) | open (switch / input_boolean, on = open), dir (input_select Open/Close, subscribed only), script | state of open | script.turn_on | switch.keypad_led_1, input_select.curtain_dir_4, script.curtain_toggle_3 |
{ kind: "buttons", … } | indicator LEDs + separate open/close buttons | openLed, closeLed, openBtn, closeBtn | state of openLed | none wired (add button.press in pressCover if you use it) | — |
label is "Curtains", "Sheers" or "Blinds". Rooms with no window covers: delete the room; no covers at all: drop the
curtains line from src/app/views.tsx. src/config/curtains.ts only feeds the demo's simulation — no view reads it.
src/config/animals.ts — pets
| Key | What it is | Domain | Reads | Example id | Missing? |
|---|---|---|---|---|---|
CATS[] (6): id, name, photo | one card per pet | — | — | mochi, /local/pets/mochi.webp | edit the list |
roomSensor(id) → sensor.<id>_room | room the pet is in now; history drives the timeline | sensor | state = a room key from ROOM_RATIO | sensor.mochi_room | the pet shows "Away" |
ratioSensor(id, "7d" | "today", room) → sensor.<id>_room_ratio_<period>_<room> | % of time per room (donut) | sensor | number 0–100 | sensor.mochi_room_ratio_7d_kitchen | history_stats below |
ROOM_RATIO (8): key, label, color | the room keys the pet sensors use | — | — | kitchen, 1fl_living_room, cat_room … | edit to their rooms |
SPOTTINGS (2): img, cam, time | "pet spotted" camera stills | input_text (camera name), input_datetime (when) | state | input_text.pet_spot_cam_1, input_datetime.pet_spot_time_1, /local/snapshots/animals/recent_1.jpg | automation below; or remove the spotting cards from views/AnimalsView.tsx |
LITTER_BOXES (4): name, state, occupied | one combined litter-box picture | sensor | state (clear / cleaning / …), occupied (on) | sensor.litter_box_1_state, sensor.litter_box_1_occupied | remove <LitterBoxes /> from views/AnimalsView.tsx |
CAT_ACTIVITY_VIEW | not used by the views | — | — | input_select.pet_view_1 | ignore |
No pets: drop the animals line in src/app/views.tsx.
Other lists
| File : key | What it is | Domain | Reads | Services | Example id | Missing? |
|---|---|---|---|---|---|---|
components/vacuum/vacuumModel.ts : VAC | robot vacuum | vacuum | state, battery_level, supported_features, friendly_name | vacuum.start, pause, stop, return_to_base, locate | vacuum.robovac | drop vacuum from app/views.tsx + the rail button in Sidebar.tsx |
… : MODE | cleaning mode | select | state, options | select.select_option | select.robovac_clean_mode | the default list is shown |
… : OP_STATE, OP_ERROR | detailed state / error | sensor | state | — | sensor.robovac_operational_state, …_error | falls back to the vacuum state |
… : IDENTIFY | "find me" when locate isn't supported | button | — | button.press | button.robovac_identify | leave |
views/VacuumView.tsx : AREAS | area chips | — | — | (shown only; send them with your vacuum's room-clean service if it has one) | room names | edit |
views/EnergyView.tsx : E | energy view | sensor | gridPower kW (+ import, − export), solarPower kW, batt %, loadPower kW; kWh gridKwh / solarKwh / battKwh × today/week/month; savings € today/yesterday/week/month/ytd | — | sensor.pv_site_power, sensor.pv_solar_power, sensor.pv_charge, sensor.pv_load_power, sensor.pv_grid_import_daily …, sensor.energy_savings_today_eur … | helpers below; no solar: drop energy from app/views.tsx |
components/music/useMusicData.ts : SPEAKERS (5) | speakers in the music popup (key, name, source = the speaker's name in the music service's device list, player) | media_player | state, volume | play_media, join, unjoin, volume_set, shuffle_set | media_player.speaker_1 … _5 | delete entries |
lib/musicSearch.ts : MUSIC_DOMAIN, MUSIC_PLAYER | favourites / recent / search in the music popup | services of a music integration that return data | search_tracks, search_artists, search_albums, search_playlists, get_playlist_favorites, get_player_recent_tracks, get_track_favorites, save_track_favorites, remove_track_favorites | — | musicplus, media_player.music_demo | see "Music" below |
| radio tab | internet radio | Home Assistant's Radio Browser integration | media_player/browse_media media-source://radio_browser | play_media | — | add the Radio Browser integration |
lib/useRealLights.ts : EXCLUSIONS, SWITCH_INTEGRATION | "Lights on" number + popup | every light.* that is on (+ switch.* of one integration if set) | /api/states | light.turn_off / switch.turn_off | — | add words to EXCLUSIONS to hide groups/virtual lights |
lib/networkData.ts | Network view (a static sheet in the demo — 1 internet line, gateway, 3 switches, 4 access points, 8 cameras, recorder, PDU, 4 hosts; every live id is sensor.demo) | sensor, camera, device_tracker | — | — | sensor.demo | edit names there, put real ids in the ent:{…} fields, or drop network from app/views.tsx |
Helpers you may need to create
Prefer the UI (Settings → Devices & services → Helpers) for helpers; the YAML below is for configuration.yaml
packages or for showing the person exactly what the UI fields mean. Replace every id with theirs.
Power use now (TOPSTRIP.power, E.loadPower) when they only have grid, solar and battery power sensors
(Settings → Helpers → Template → Sensor, unit kW):
template:
  - sensor:
      - name: "Home power now"
        unique_id: home_power_now
        unit_of_measurement: kW
        device_class: power
        state_class: measurement
        state: >
          {{ (states('sensor.grid_power') | float(0)
            + states('sensor.solar_power') | float(0)
            - states('sensor.battery_charge_power') | float(0)) | round(2) }}
Daily / weekly / monthly kWh (E.gridKwh, E.solarKwh, E.battKwh): one Utility Meter helper per period
(Settings → Helpers → Utility Meter; input = their energy sensor in kWh; cycle daily / weekly / monthly).
Savings in € (E.savings.*): a template sensor, e.g. {{ (states('sensor.solar_energy_daily')|float(0) + states('sensor.battery_export_daily')|float(0)) * 0.25 }} with their tariff, and Utility Meters for the periods
(yesterday = the daily meter's last_period attribute). Change the € sign in views/EnergyView.tsx (en-sav-cur).
Room A/C (ROOM_AC): an input_number target helper (16–30, step 1) and a toggle script per unit, plus one
automation that applies target changes (Home Assistant 2024.10+ syntax; older versions write trigger: / platform:
and action: lists):
script:
  living_ac_toggle:
    alias: Living A/C toggle
    sequence:
      - if:
          - condition: state
            entity_id: climate.living_room_ac
            state: "off"
        then:
          - action: climate.set_temperature
            target: { entity_id: climate.living_room_ac }
            data:
              hvac_mode: cool
              temperature: "{{ states('input_number.living_ac_target') | float }}"
        else:
          - action: climate.turn_off
            target: { entity_id: climate.living_room_ac }
automation:
  - alias: Living A/C target follows the dashboard
    triggers:
      - trigger: state
        entity_id: input_number.living_ac_target
    conditions:
      - condition: not
        conditions:
          - condition: state
            entity_id: climate.living_room_ac
            state: "off"
    actions:
      - action: climate.set_temperature
        target: { entity_id: climate.living_room_ac }
        data:
          temperature: "{{ trigger.to_state.state | float }}"
(Or skip the helpers: change RoomAcControl in components/rooms/RoomCard.tsx to call climate.set_temperature /
climate.set_hvac_mode directly — a ten-line change.)
Pet rooms. sensor.<pet>_room must hold one of the ROOM_RATIO keys. Typical sources: a BLE room-presence
integration with a tag on the collar (for example Bermuda BLE Trilateration from HACS: its area sensor + a template
that maps area names to the keys), or camera detections. Then one History stats helper per pet × room × period
(Settings → Helpers → History stats, type "ratio"):
sensor:
  - platform: history_stats
    name: mochi_room_ratio_7d_kitchen
    entity_id: sensor.mochi_room
    state: kitchen
    type: ratio
    end: "{{ now() }}"
    duration: { days: 7 }
  - platform: history_stats
    name: mochi_room_ratio_today_kitchen
    entity_id: sensor.mochi_room
    state: kitchen
    type: ratio
    start: "{{ today_at() }}"
    end: "{{ now() }}"
That is 2 × rooms × pets sensors — generate the YAML with a short script rather than by hand.
Pet spotted (SPOTTINGS): input_text.pet_spot_cam_1, input_datetime.pet_spot_time_1 (date + time) and an
automation that, when their camera detects an animal, saves camera.snapshot to
/config/www/snapshots/animals/recent_1.jpg (Home Assistant serves www/ as /local/), then sets the two helpers.
The card adds the time to the picture URL, so a new snapshot shows up at once.
Curtains with scripts (the scripted kind): an input_boolean "<room> curtains open", an input_select with
Open / Close, and a script that moves the motor and flips the boolean. With cover.* entities none of this is
needed — use kind: "cover".
Music. The music popup's library (favourites, recent tracks, search) uses a music-service custom integration whose
services return data (return_response): the service names it calls are listed in the table above, and the domain is
MUSIC_DOMAIN in src/lib/musicSearch.ts. If their integration names things differently, adapt the calls in that
file (each is one line); items() there reads the answer from result (a list) or result.items. With
Music Assistant, replace the search functions with music_assistant.search (callServiceResponse) and play the
returned URIs with media_player.play_media. With no such integration the media bar and the radio still work; the
library tabs stay empty.
7. Step 3 — Go live
The go-live kit is already wired into this package (src/main.tsx, src/main.live.tsx, src/main.panel.tsx,
src/ha/wsBackend.ts, src/ha/hassBackend.ts, src/ha/authFetch.ts, vite.config.ts, .env.example,
panel-loader.js). live/README.md has the full detail; in short:
cp .env.example .env.live # VITE_HA_MODE=live, then fill in per mode- Mode A — inside Home Assistant (recommended).
BASE=/local/dashboard/in.env.live, thennpm run build:live→ copy everything indist/to<config>/www/dashboard/(Samba, File editor or Studio Code Server add-on, orscp). Openhttp://homeassistant.local:8123/local/dashboard/index.htmlon the tablet (use the same address they log in with; HTTPS if their Home Assistant is on HTTPS). The first visit shows Home Assistant's own login page; the browser keeps the session. Files inwww/are public to anyone who can reach Home Assistant — a build never contains a token (the config refuses to bake one in). - Mode B — a page in Home Assistant's sidebar. Mode A's steps, plus copy
panel-loader.jsnext to the build and add thepanel_custom:block from the top ofpanel-loader.jstoconfiguration.yaml; restart. Uses Home Assistant's session, no extra login. - Mode C — development against their Home Assistant.
VITE_HA_TARGET=http://homeassistant.local:8123andVITE_HA_TOKEN=<long-lived token>in.env.live, thennpm run dev:live. The dev server proxies/api(REST and WebSocket) and adds the token. Only on their own network: anyone who can load that page acts as that user.
Once live and happy, optionally delete the demo: src/demo/, src/main.demo.tsx (and the else branch in
src/main.tsx), src/ha/mockBackend.ts, src/lib/mockApi.ts, src/lib/energyDay.ts, src/lib/catHistory.ts,
src/config/curtains.ts. Keep src/lib/demoFlags.ts (the radar imports it; live never switches it on). A live build
leaves all of these out anyway.
8. Step 4 — Pictures
Every picture the app shows. keep = generic, fine in any home; replace = shows the made-up home — keep them as placeholders or swap in pictures of their home.
| Path | Count · size | Role | |
|---|---|---|---|
public/curtains3d/<key>day_hf.jpg, <key>storm_hf.jpg — keys dining, study, courtyard, living_room, bed2, pr, b4, b3, bath | 18 · 1264×848 JPEG | 3D window plates, two per room (key from ROOMS3D) | replace |
public/local/rooms/ tatami, living_room, kitchen, dining, courtyard, garage, study2, study, stairway, master_bedroom, master_bathroom, dressing, family_room, cat_room, studio, guest1, bedroom2, bedroom4 .jpeg | 18 · 1264×848 JPEG | Rooms cards (ROOMS[].photo; shown greyed when the light is off) | replace |
public/local/pets/ mochi, yuki, sora, kuro, hana, ren .webp | 6 · 512×512 WebP | pet portraits (CATS[].photo) | replace |
public/local/snapshots/animals/recent_1.jpg, recent_2.jpg | 2 · 1264×848 JPEG | "pet spotted" stills; live, their automation writes these into www/ | replace (live: automatic) |
public/local/weather/{clear,partly,cloudy,fog,rainy,storm}-{day,night}.webp | 12 · 1000×558 WebP | weather-card skies | keep |
public/local/network/assets/gear/ gateway, switch-16, switch-24, ap-ceiling, ap-wall, ap-outdoor, nas, mini-pc, recorder, pdu, hub .svg | 11 SVG | network gear drawings (Network view) | keep |
public/local/robovac-{docked,charging,running,returning,paused,error}.svg, vac-{docked,working}.svg | 8 SVG | vacuum states (Vacuum view, rail) | keep |
public/local/lock-{locked,unlocked}.svg, litter-{clear,occupied,cleaning}.svg | 5 SVG | rail lock button, litter-box status | keep |
public/local/lights-{on,off}2.svg, dining{on,off}.svg | 4 SVG | feature-light toggles on room cards | keep |
public/local/darkdash.svg, public/darkdash-icon.png | logo · 180×180 icon | rail logo, Home-Screen icon | keep (or their own) |
public/fonts/*.woff2 | 2 | Archivo, Oswald | keep |
3D window plates — the exact spec. One pair per room, 1264×848 (3:2):
- Head-on, level view of the window wall from inside, the window centred, its frame well inside the picture with a darker wall around it; nothing in front of the glass (no curtains, furniture or people — the engine draws the curtains). Camera height ≈ mid-window, straight lens (no wide-angle bulge).
day: bright clear day outside.storm: the same picture (made by editing the day image, never generated separately) with dark storm clouds and wet ground. The frame and every mullion must stay on the same pixels — runpython3 tools/check_plate.py <day> <storm> --glass …and expect "shift +0 px … OK" both ways.- Frames and mullions should be clearly darker than the glass (the rain mask treats dark as solid);
tools/check_plate.pywrites<out>-mask.pngso you can see it. - Then measure
glass(inside the frame, never over the wall), and optionallypool(inset from the visible water) anddeckrectangles;check_plate.py --outdraws them on the plate. Put the numbers inROOMS3D. - Night, dusk, fog, snow and rain are made from these two by the engine — no extra pictures.
Room photos. 1264×848, eye-level, the whole room, lights on, warm evening light suits the dark theme; the same lens and time of day across rooms keeps the set consistent. Pet portraits. square, the pet centred, plain background, 512×512. Spotting stills. what their camera sees (live, the automation writes them).
Process every new picture with tools/fit_image.py (exact size, metadata removed — phone photos carry GPS):
pip install Pillow
python3 tools/fit_image.py ~/Pictures/living.jpg public/local/rooms/living_room.jpeg 1264x848
python3 tools/fit_image.py dining-day.png public/curtains3d/diningday_hf.jpg 1264x848
python3 tools/fit_image.py dining-storm.png public/curtains3d/diningstorm_hf.jpg 1264x848
python3 tools/fit_image.py mochi.jpg public/local/pets/mochi.webp 512x512 --anchor top
python3 tools/check_plate.py public/curtains3d/diningday_hf.jpg public/curtains3d/diningstorm_hf.jpg \
    --glass 0.12,0.095,0.88,0.85 --pool 0.425,0.37,0.575,0.415 --out dining-check.png
Keep the file names (or update photo / key / img in the config).
Prompt templates (the demo's pictures are a photoreal, warm, high-end look — Provence stone, olive trees, linen, oak; keep one style sentence identical across every prompt):
- Window plate, day: "Architectural interior photograph, straight-on and level, of a [floor-to-ceiling steel-framed glass door with N vertical panes] in a [room], seen from inside. The window frame is centred and fills about 80 % of the picture; the wall around it is in shadow. Outside: [their garden / street / view] on a bright clear day, crisp detail. No curtains, no furniture in front of the glass, no people. 3:2, natural colours."
- Window plate, storm (an edit of the day image, same canvas): "Same photograph, identical framing, window frame and mullions unchanged. Change only the weather outside: heavy dark storm clouds, rain-soaked wet ground with puddles, dim grey light."
- Room: "Photograph of a [room] in [style], eye level, whole room visible, warm lamps on, soft evening light, tidy, no people, 3:2." (Their own photo + "restyle in the same light and colours" works well as a reference.)
- Pet: "Portrait of a [colour, pattern] [breed] cat sitting, facing the camera, soft studio light, plain warm grey background, square." Their own pet photos as references are fine — it's their home.
Free alternatives (the demo's pictures were made with a paid hosted generator; you don't need one):
- Their own camera — best for this photographic look: real rooms, real windows. Shoot the plates head-on from a tripod; make the storm version with an image-editing model (below) or on a grey rainy day from the same tripod spot.
- Local and free: FLUX.1 [schnell] or SDXL in ComfyUI or Forge (a recent GPU), Draw Things on a Mac/iPad. For the storm edit use an instruction-edit model (FLUX.1 Kontext [dev], Qwen-Image-Edit) or inpaint only the glass area.
- Free tiers: Google Gemini (good at "same image, change only the weather" edits), ChatGPT's free image tier, Microsoft Designer / Bing Image Creator, Ideogram, Leonardo, Adobe Firefly (generative fill keeps framing), Krea.
- No AI: their photos + one consistent filter/LUT; a free 3D model of the house in Sweet Home 3D or Blender rendered head-on at the windows; or an illustrator.
- Consistency: generate the day plates from one reference image (or one seed + the same style sentence), keep the same lens and time of day, and always make the storm plate by editing its own day plate.
9. Step 5 — Build & run
npm run build:live        # live, into dist/ (mode A/B; BASE from .env.live)
npm run build             # the demo, into dist/ (any static host; it never contacts Home Assistant)
npm run preview           # serves dist/ locally to check it
Host: mode A puts it inside Home Assistant (/local/dashboard/), which is the simplest; any static host works for the
demo build. On the tablet:
- iPad: open the address in Safari → Share → Add to Home Screen (runs full screen;
index.htmlclears the status bar). Settings → Display & Brightness → Auto-Lock "Never" while on the charger; Guided Access (Accessibility) locks it to the app. - Android / Fire tablets: Fully Kiosk Browser (start URL, keep screen on, motion/schedule screen-off, remote admin) or a Home-Screen web app in Chrome.
- Size: designed at 1560 × 1170 CSS px (4:3), where every view fits without scrolling. Smaller screens:
zoom the page out so the CSS viewport is about that size — a 12.9"/13" iPad (1366×1024) at Safari page zoom 85 %,
an 11" iPad at 75 %; in Fully Kiosk set the zoom/initial scale the same way. Larger or 16:9 screens work; the
columns stretch. Opening it with
?embed=1pins the layout to exactly 1560×1170 (for showing it scaled inside another page).
10. Step 6 — Verify
Tick each with the person watching the tablet:
-
npm run typecheck— 0 errors;npm run build:livesucceeds. - Opens without a login loop; the browser console shows no errors.
- Home: every A/C row shows a temperature; tapping one turns that unit on/off in Home Assistant; weather card shows their condition and temperature; the clock matches the wall clock; calendar shows their next events; area chips have numbers; the radar is centred on their town.
- Top strip: AQI, humidity and power show numbers; "Lights on" matches what is really on; its popup turns a light off.
- Rooms: each card's light toggles and dims the right light; A/C toggles and ±1° change the right unit; curtain lines say OPEN/CLOSED correctly.
- Curtains & Sheers: each button moves the right curtain; the 3D cloth follows; the outside matches the weather and day/night; rain stays on the glass (not on the wall).
- Animals: each pet's room and donut look right; the timeline loads; spotting stills update after a detection.
- Energy: chips match their energy dashboard; PRESENT and TOTALS charts draw today up to now.
- Music: media bar controls the right speaker; radio plays.
- Vacuum: start / pause / dock work; the status picture follows.
- Performance on the target tablet: views switch instantly; Curtains & Sheers animates smoothly (if not, see Gotchas); leave it running for an hour — memory stays flat and it reconnects after a Home Assistant restart.
11. Make it theirs
- Names and rooms:
src/config/*.ts(room names are shown in capitals as written); pets inconfig/animals.ts; vacuum areas inviews/VacuumView.tsx; the network sheet inlib/networkData.ts. - Colours and fonts:
src/styles/theme.css(--goldis the accent;--bg-glow, glass and card tokens), per-view stylesheets insrc/views/*.css; fonts inpublic/fonts+src/styles/fonts.css+--font. - Language: Section 4, i18n. Date formats use
toLocaleDateString("en-GB", …)in a few components — change the locale there too. - Units and currency: °C / km/h come from their entities' values (labels in
WeatherScene.tsx,RadarMap.tsx); the€sign is inviews/EnergyView.tsx. - Remove a view: delete its line in
src/app/views.tsx(and its import). The rail follows. - Logo and name:
public/local/darkdash.svg,public/darkdash-icon.png,<title>inindex.html. - Calendar colours:
CALENDARS[].color.
12. Gotchas
- Big installations: never subscribe to all states; each view passes its own id list (
useEntities). History requests are bounded (explicit ids + time window) — keep them that way. - iPad / WebKit memory: the 3D view loads one room at a time and disposes it when you leave; keep plates at
1264×848 (bigger textures cost memory and gain nothing). Older iPads may need fewer rain particles (
RAIN_Ninengine.ts). Pinch-zooming a page that shows the dashboard scaled in an iframe can crash Safari — block pinch gestures on such pages. - Time zone: the clock, day/night and "today" use the tablet's own time zone — set it to the home's. The sky
follows
sun.sun, so sunrise and sunset are right for their location automatically. - Weather conditions: the card understands Home Assistant's standard conditions (
sunny,clear-night,partlycloudy,cloudy,fog,rainy,pouring,lightning-rainy,snowy,snowy-rainy,windy,hail,exceptional); anything else shows the cloudy sky. prefers-reduced-motion: sky and 3D cross-fades shorten to near-instant; the ambient animations stay.- History: the energy charts and pet timelines need the Recorder (on by default) to keep at least 7 days.
- Radar: RainViewer's public API (no key, internet needed). Keep
HOME_LOCATIONto a town, not an exact address. - Mixed content: an HTTPS page cannot talk to
http://Home Assistant — serve the dashboard from Home Assistant itself (mode A) and this never comes up. - Tokens: never in a build, a repo or a public page; mode C's dev server is for their own network only.
- The demo layer (
src/demo/) is only in demo builds; if you copy code from it into live code, read the time viasrc/lib/clock.ts, notDate.now().
13. Licences
- Code: MIT — see
LICENSE("Copyright (c) 2026 dashboards.casa"). - Fonts: Archivo and Oswald, SIL Open Font License 1.1 —
public/fonts/OFL-archivo.txt,OFL-oswald.txt. - The made-up home's pictures: made for this demo; free to use as examples and placeholders.
- npm packages (React, three.js, Vite, home-assistant-js-websocket, @mdi/js …): their own licences, installed by npm.
- Weather radar tiles: RainViewer, under their terms of use.